Introduction
If you’re exploring decentralized finance (DeFi), one tool is essential: MetaMask. This wallet is your passport to the Ethereum ecosystem and beyond – used by over 30 million people worldwide to store assets, interact with dApps, and stay in control of their crypto.
Whether you're swapping tokens, minting NFTs, or diving into yield farming, MetaMask provides the simplest and most secure way to get started. It’s self-custodial, beginner-friendly, and compatible with every major EVM chain.
In this guide, you’ll learn how to install, set up, and customize your MetaMask wallet step by step. We’ll cover everything from securing your recovery phrase and adjusting privacy settings to connecting hardware wallets like Ledger and Trezor. You’ll also learn how to receive and send tokens, perform swaps, bridge between networks, and integrate MetaMask with the DeFi tools you actually use. By the end, you’ll have the confidence to use MetaMask securely across any EVM-compatible ecosystem.
Why Choose MetaMask for DeFi?
MetaMask isn’t just another crypto wallet – it’s the default gateway into the DeFi world. With over 30 million users, it’s the most widely adopted self-custodial wallet for Ethereum and EVM-compatible blockchains.
Built for Ethereum and Beyond
MetaMask was designed for the Ethereum network but has evolved to support the full EVM ecosystem – including chains like:
- Arbitrum
- Polygon
- Optimism
- BNB Smart Chain
- And custom networks via RPC configuration
This makes it ideal for users who want to explore DeFi protocols across multiple chains without switching wallets.
Native Browser Integration
One of MetaMask’s biggest strengths is its browser extension wallet. It transforms your browser into a DeFi hub, enabling seamless interaction with thousands of decentralized apps (dApps) across lending, swapping, NFTs, DAOs, and more. Just visit a dApp, connect your wallet, and you’re in.
MetaMask supports:
- Chrome
- Brave
- Firefox
- Edge
Mobile users aren’t left behind either – the MetaMask mobile app offers full wallet features and an integrated dApp browser on iOS and Android.
The DeFi Standard
Because of its widespread use and deep dApp compatibility, MetaMask is often the first wallet developers support when launching new protocols. If you're using DeFi for the first time – or deploying a smart contract – chances are MetaMask is part of the flow.
Whether you're connecting to Uniswap, claiming an airdrop, or testing your first smart contract on a testnet, MetaMask is almost always the starting point.
What is MetaMask?
MetaMask is a non-custodial Ethereum wallet that gives you full control over your crypto assets. It allows users to manage digital assets, interact with decentralized applications (dApps), and sign blockchain transactions – all without relying on a centralized intermediary.
Unlike custodial wallets, MetaMask never holds your private keys. You alone control access to your funds through a Secret Recovery Phrase, stored securely on your device.
Available on Browser and Mobile
MetaMask comes in two main versions:
- Browser extension for Chrome, Brave, Firefox, and Edge
- Mobile app for iOS and Android
Both versions offer full wallet functionality, allowing you to:
- View your balances
- Send and receive ETH and tokens
- Connect to dApps
- Approve or reject transactions
- Manage multiple accounts
Whether you're at your desk or on the go, MetaMask makes it easy to access the decentralized web.
Core Features
MetaMask’s key functions include:
- Asset management: Store, send, and receive ETH, ERC-20 tokens, and NFTs
- dApp interaction: Seamlessly connect with DeFi platforms like Uniswap, Aave, Curve, and more
- Transaction signing: Review and confirm blockchain transactions directly in your wallet
It's trusted by both beginners and developers for its simple interface, robust functionality, and compatibility with every major DeFi tool on Ethereum and EVM chains.
How to Install MetaMask
Browser Extension Installation
Installing MetaMask on your browser is quick and secure if you follow the right steps. This guide covers Chrome and Brave, with quick notes on other browsers.
1: Visit the Official MetaMask Site
Go to metamask.io and click the “Get MetaMask” button in the top right corner.
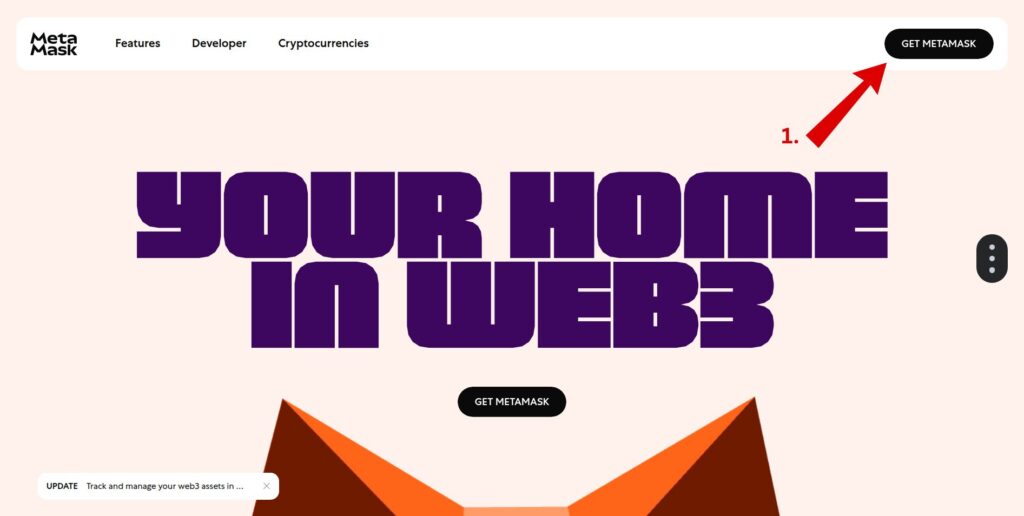
Tip: Always verify the URL to avoid fake extensions. Official site is https://metamask.io.
2: Add MetaMask to Brave (or Chrome)
You’ll be redirected to the browser’s extension store. Click the “Add to Brave” (or “Add to Chrome”) button to begin installation.
3: Confirm Extension Permissions
A browser prompt will appear outlining what MetaMask can do – including reading site data and modifying clipboard contents. Click “Add extension” to proceed.
Why these permissions? MetaMask needs them to:
- Detect dApp connection requests
- Display notifications (e.g. transaction status)
- Help you interact with sites directly from your wallet

⚠️ Note: Your browser may warn you about permissions. This is normal – MetaMask needs access to interact with websites for transaction approvals.
Quick Reference for Other Browsers
- Firefox: Supported through addons.mozilla.org
- Edge: Uses the Chrome Web Store as it's Chromium-based
- Safari: Currently unsupported for extensions – use the MetaMask mobile app instead
Setting Up Your MetaMask Wallet
Once MetaMask is installed, it's time to create and secure your wallet. Follow these exact steps to set up your new self-custodial wallet safely and correctly. Each instruction matches the numbered steps in the screenshots provided.
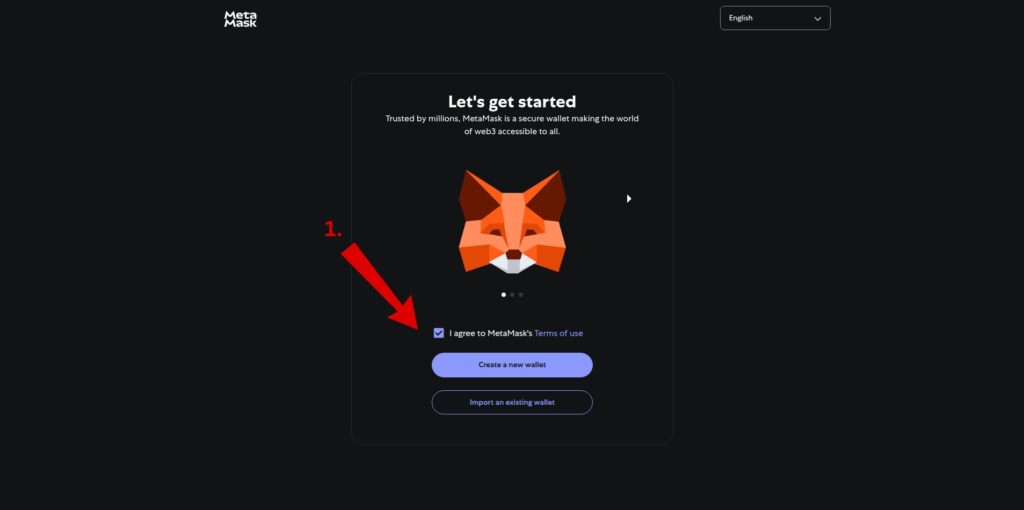
1. Agree to Terms and Create a New Wallet
Check the box to accept MetaMask's Terms of Use, then click “Create a new wallet.”
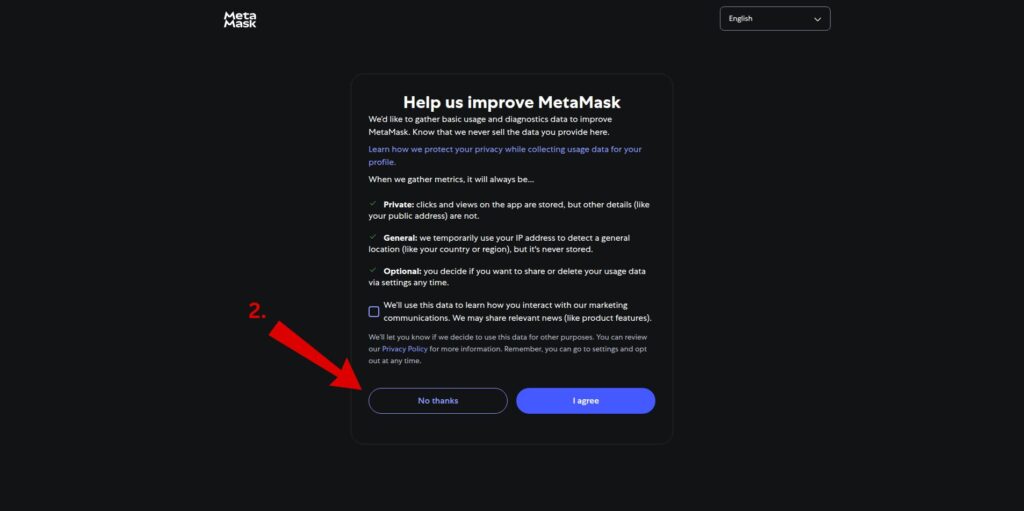
2. Choose Privacy Preferences
MetaMask will ask if you'd like to share usage data to help improve the app. For maximum privacy, click “No thanks.”
3. Set a Secure Password
Create a strong password (minimum 8 characters) to protect access to MetaMask on your device. Confirm it, then click “Create a new wallet.”

Note: This password protects only local access. It’s not recoverable – losing it means you'll need your Secret Recovery Phrase to regain access.
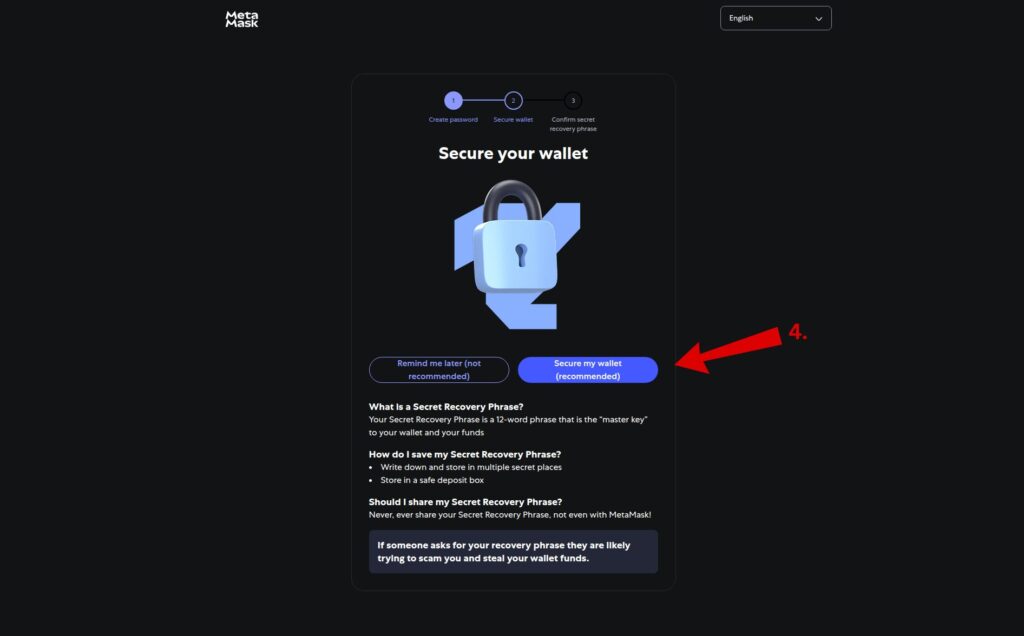
4. Secure Your Wallet
Click “Secure my wallet (recommended)” to continue with backing up your Secret Recovery Phrase – the master key to your wallet.
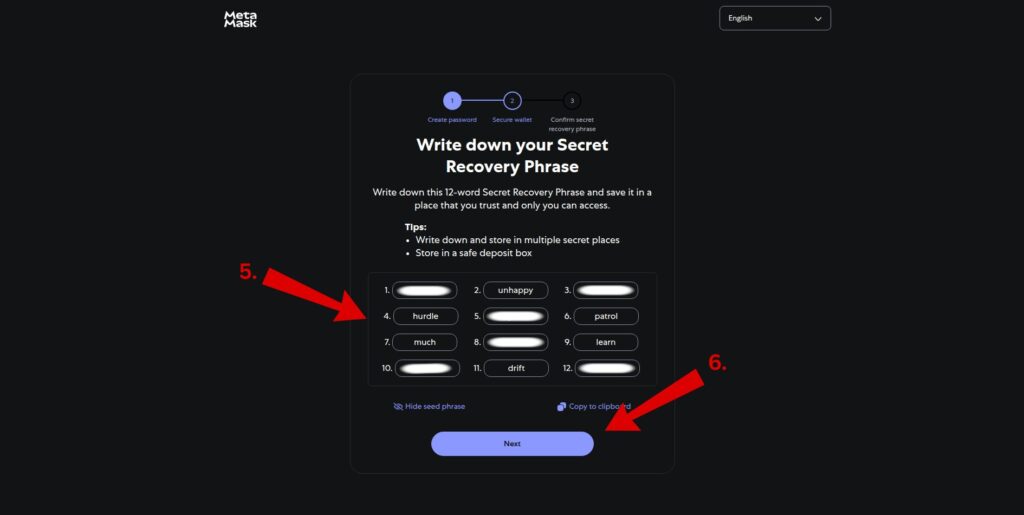
5. Write Down Your Secret Recovery Phrase
MetaMask will display your unique 12-word phrase. Write it down in the exact order and store it in a secure place offline. Click “Next” when ready.
6. Continue After Backup
Once you’ve written down the phrase, click “Next” to move forward.
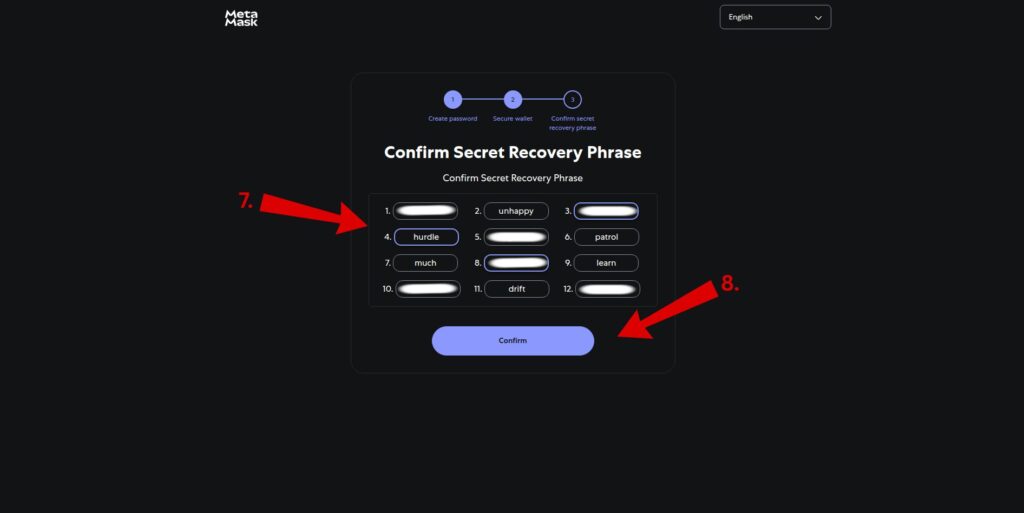
7. Confirm Your Secret Recovery Phrase
Select each word in the correct order to confirm that you've saved the phrase accurately.
This step ensures your backup is complete and recoverable.
8. Finalize Setup
Click “Confirm” to complete your wallet setup.
Important: Never share your Secret Recovery Phrase. Anyone with it can access your wallet and funds.
Wallet Setup Complete
🎉 You're done! Your MetaMask wallet is now active and ready to use.
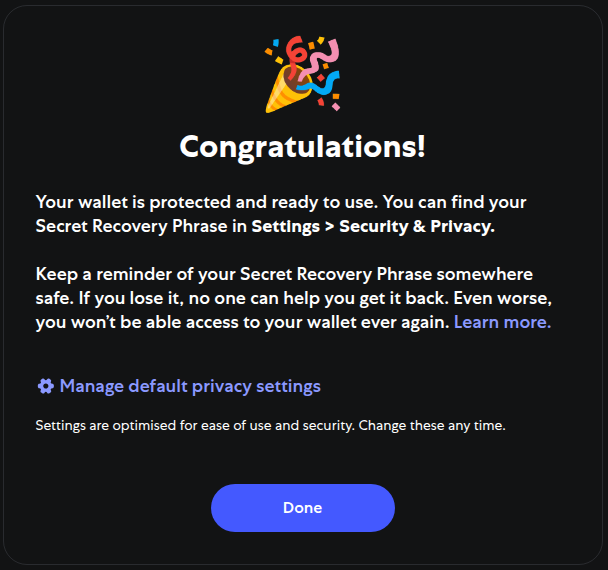
You can now:
- Receive and store ETH or tokens
- Connect to dApps
- Start exploring DeFi
Next, we’ll look at how to customize settings, and how to import an existing wallet.
Customizing MetaMask Settings
MetaMask isn’t just a wallet – it’s a customizable gateway to DeFi. By default, it comes well-optimized for most users, but there are a few important settings worth reviewing. Fine-tuning these options helps you enhance privacy, reduce distractions, and improve security. In this section, we’ll walk you through how to access the settings and adjust them for a safer, cleaner experience.
Accessing MetaMask Settings
Before you can update anything, you need to open the settings menu inside MetaMask. Here’s how:
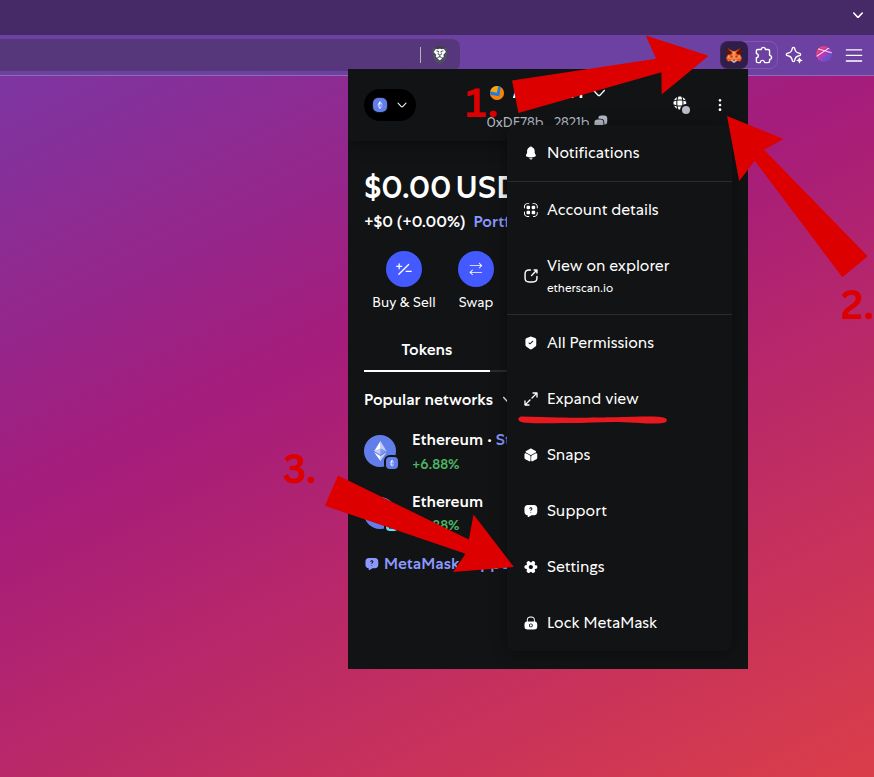
1. Click the MetaMask Icon
In your browser toolbar (top right), click the MetaMask fox icon to open your wallet.
2. Open the Wallet Menu
Inside the wallet pop-up, click the three-dot menu icon (top right). This reveals more options.
3. Go to Settings
Scroll down the menu and click “Settings” at the bottom.
Alternatively, click “Expand view” to open MetaMask in a full browser tab for a clearer layout.
Adjusting Advanced Settings
Once inside the Settings menu, you’ll see a variety of advanced options. One of the first tweaks many users make is disabling the backup reminder — but only if you’ve already securely saved your Secret Recovery Phrase.
4. Dismiss Backup Reminder
Scroll down to the Advanced section in Settings.
Find the option labeled “Dismiss Secret Recovery Phrase backup reminder.”
Toggle this switch ON to stop seeing reminder prompts.
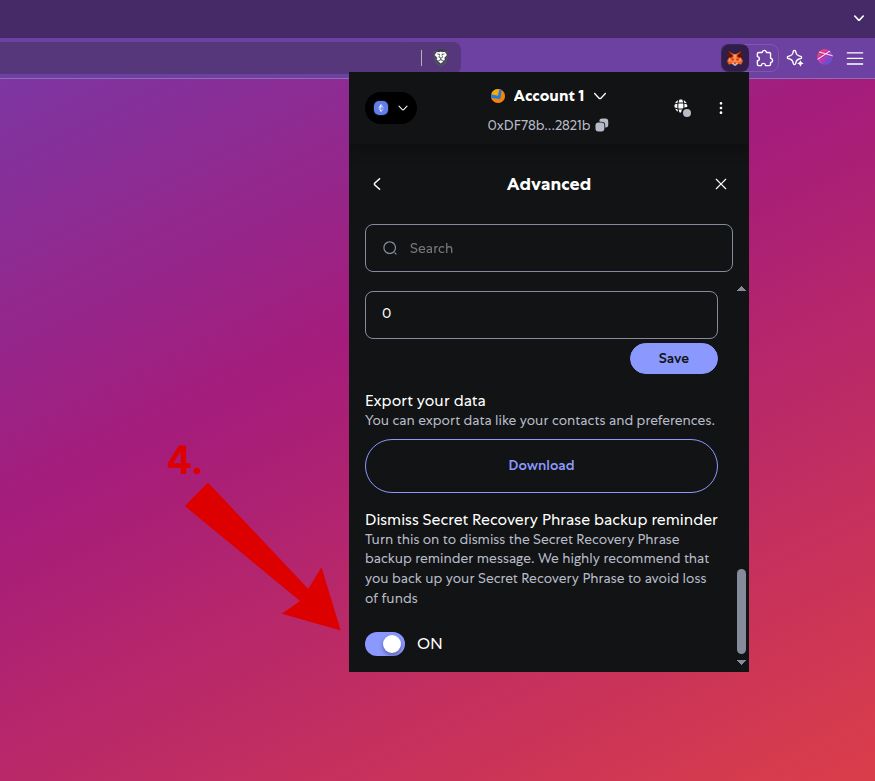
🛡️ Important: Only enable this if you have safely written down and stored your Secret Recovery Phrase offline. This setting won’t disable your ability to recover your wallet, but it removes MetaMask's safety nag in future sessions.
Managing Security & Privacy Settings
For maximum privacy and minimal tracking, it’s recommended to disable all optional data collection. Even if you skipped this during setup, you can easily change it now.
5. Turn Off MetaMetrics Data Collection
Inside the Security & Privacy section of Settings, scroll down to the bottom. You’ll see two important toggles:
- Data collection for marketing
- Delete MetaMetrics data
Make sure both switches are turned OFF (as shown in the screenshot below).
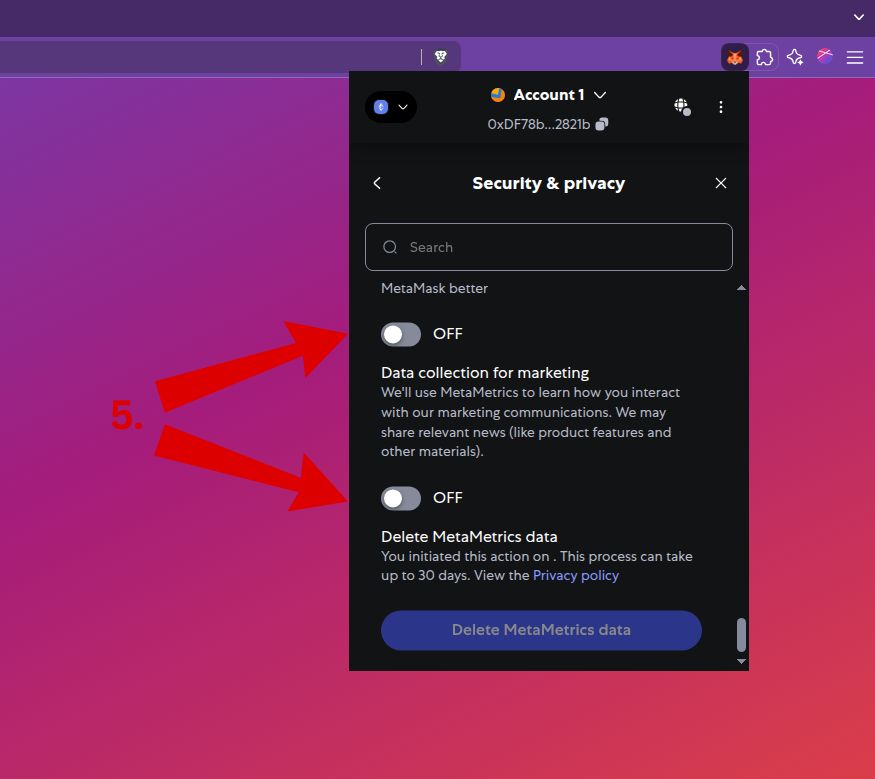
🔒 Why this matters:
MetaMask uses MetaMetrics to collect anonymous usage analytics and potentially share marketing content. While this data is not personally identifying, disabling it ensures a cleaner, more private experience.
Enabling Notifications
MetaMask can notify you about important wallet activity — including sent or received funds, account actions, and product updates. Keeping notifications on is recommended for most users to stay aware of what’s happening.
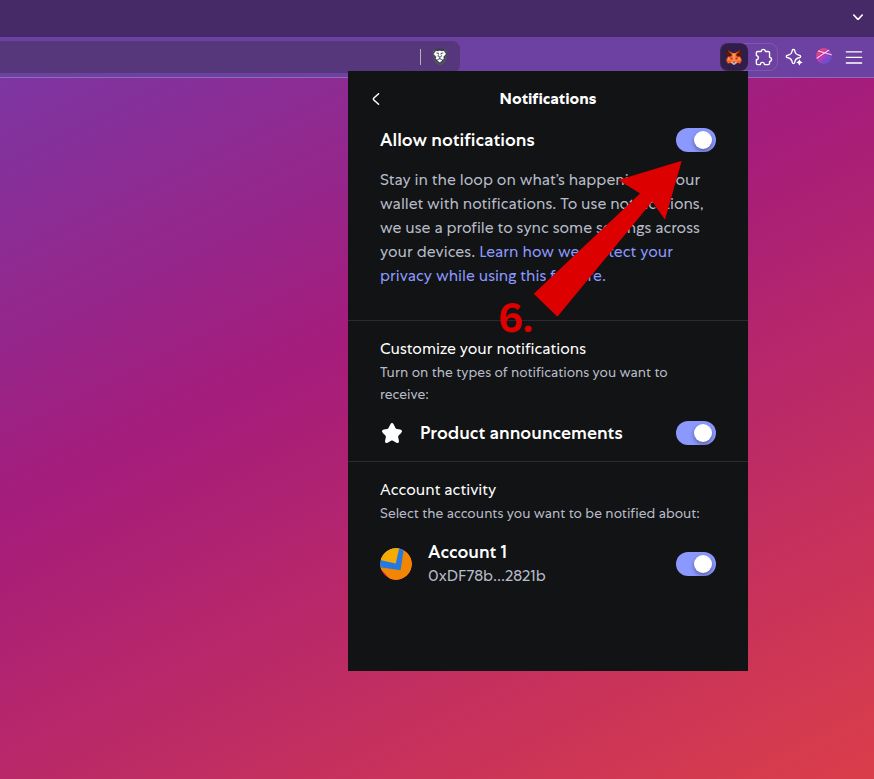
6. Turn On Wallet Notifications
Go to the Notifications section in Settings. Make sure “Allow notifications” is toggled ON.
This enables alerts for:
- Incoming and outgoing transactions
- Wallet connection attempts
- Product announcements and feature updates
- Account-specific activity
These alerts help you catch suspicious activity early or confirm when a transaction is completed – especially useful if you're using MetaMask across multiple devices.
MetaMask Settings Recap
By now, you should have:
- Accessed the wallet settings menu
- Disabled the backup reminder (if already backed up)
- Turned off MetaMetrics data collection for privacy
- Enabled notifications for real-time updates
Your MetaMask wallet is now better optimized for security, privacy, and convenience.
Importing Wallets
If you've used another Ethereum wallet before – like Rabby – you can easily bring your existing address into MetaMask using your Secret Recovery Phrase. This is especially useful if you’ve already set up wallets and want to manage them all in one place.
Need help with Rabby Wallet first? Check out our guide here: Rabby Wallet: Your Gateway to DeFi
To begin, make sure MetaMask is open in expanded view for a full-screen layout.
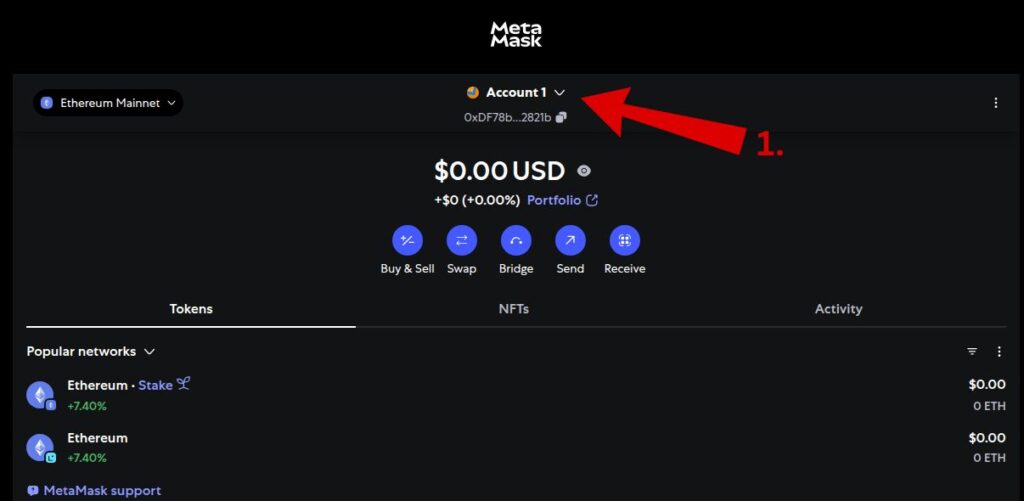
1. Click Your Account Name
At the top of the MetaMask dashboard, click your account name (e.g., “Account 1”). This opens a wallet options menu.
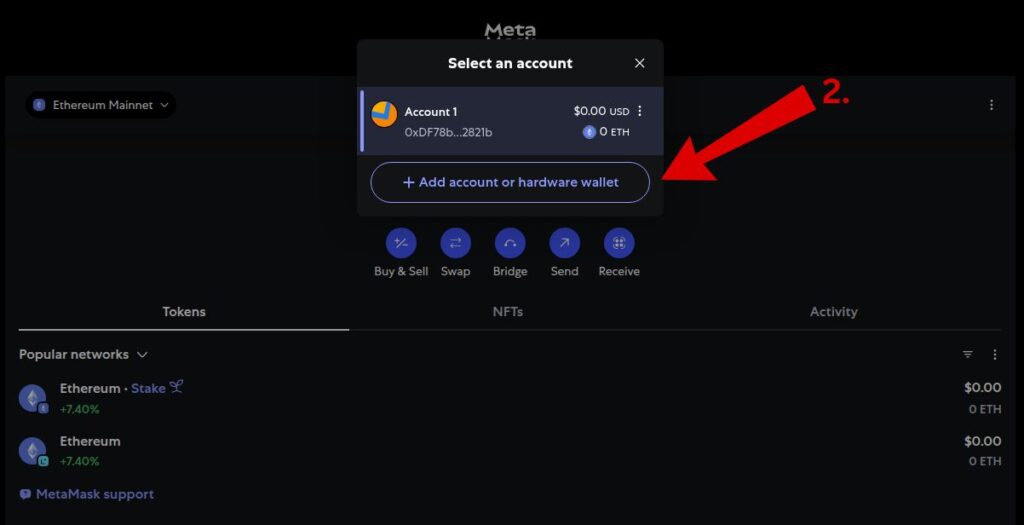
2. Click “Add Account or Hardware Wallet”
In the dropdown that appears, select “+ Add account or hardware wallet.”
This will bring up different options for adding or importing accounts.
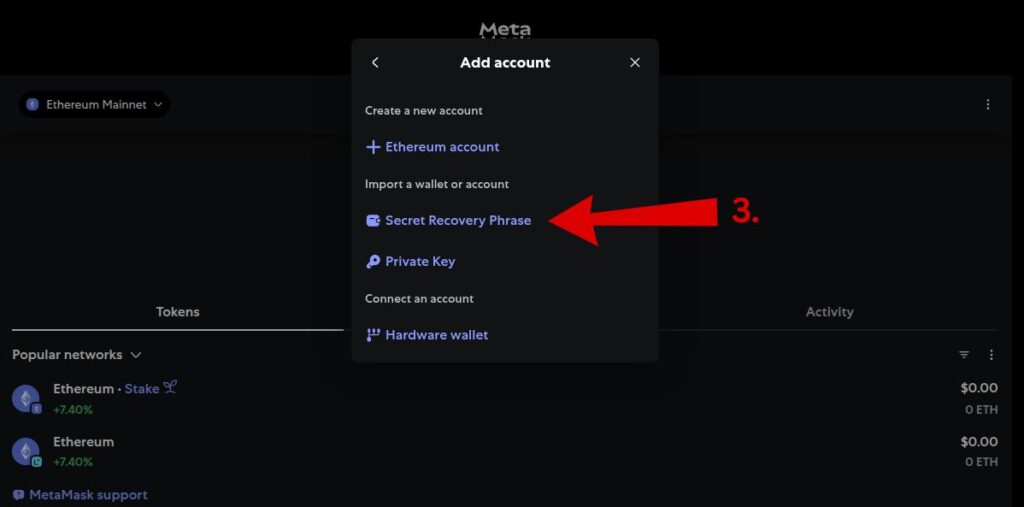
3. Select “Secret Recovery Phrase”
Under the “Import a wallet or account” section, click “Secret Recovery Phrase.”
This option lets you import a wallet using a 12- or 24-word seed phrase from another interface like Rabby or Trust Wallet.
4. Enter Your Recovery Phrase
Carefully enter your Secret Recovery Phrase.
If you’re using a 24-word phrase, click the option just below to expand the input fields.
Once done, click “Import wallet.”
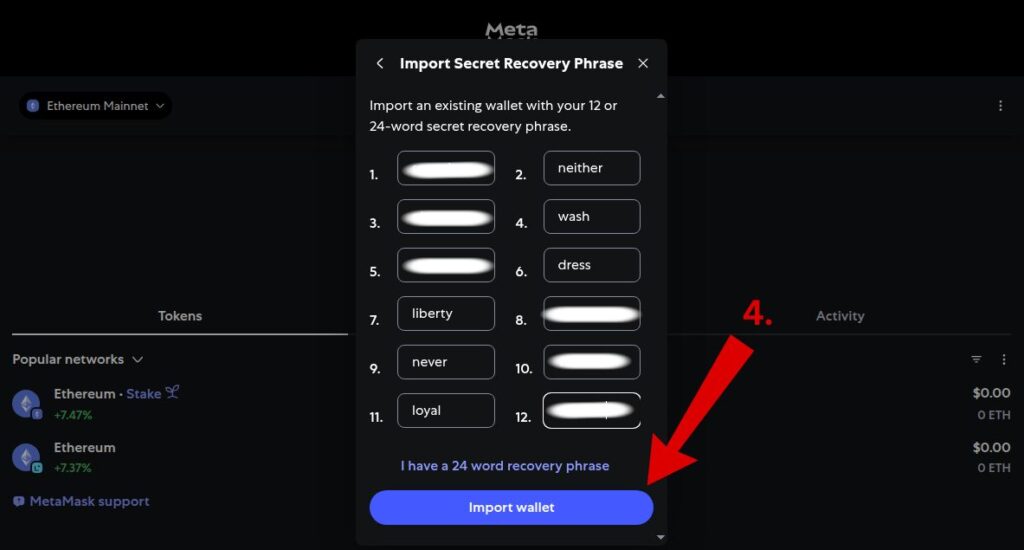
🛡️ Reminder: Only enter your recovery phrase into the official MetaMask interface / never paste it into any website or DApp.
5. View Your Imported Wallet
Once your wallet is successfully imported, you’ll see it listed in your account selector menu at the top. Each wallet will display with its corresponding name and address.
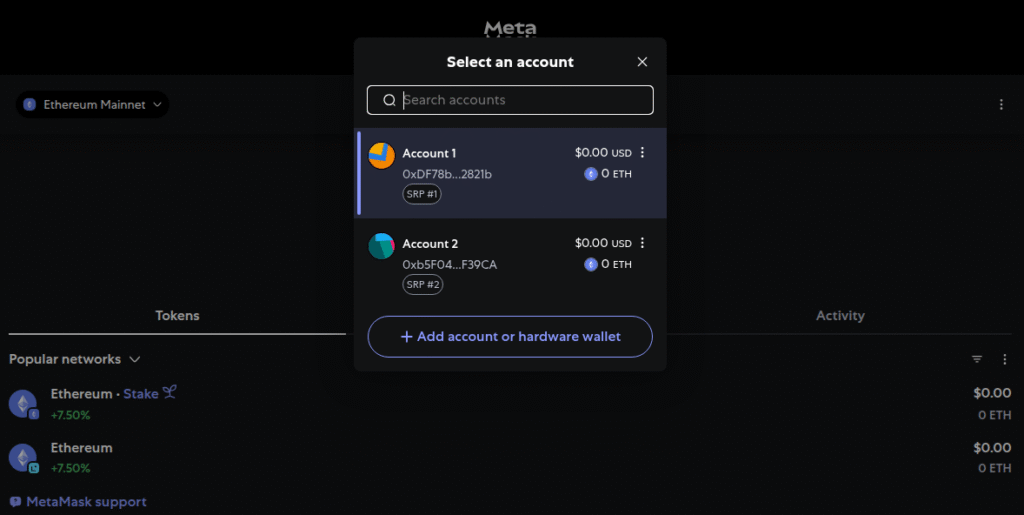
You can now switch between accounts and manage them individually – even if they were created using separate recovery phrases.
Connecting a Ledger Wallet to MetaMask
For added security, many DeFi users rely on hardware wallets like Ledger. MetaMask makes it easy to connect a Ledger device, giving you full control over your private keys while still interacting with dApps via MetaMask’s interface.
Below is a step-by-step guide on how to set up and connect your Ledger with MetaMask.
1. Access the Hardware Wallet Menu
Start by clicking your account icon at the top of MetaMask. From the dropdown, select “Add account or hardware wallet” to open the wallet integration screen — just like we did earlier when importing a wallet via Secret Recovery Phrase.
This menu is your gateway for importing, creating, or connecting all types of accounts in MetaMask.
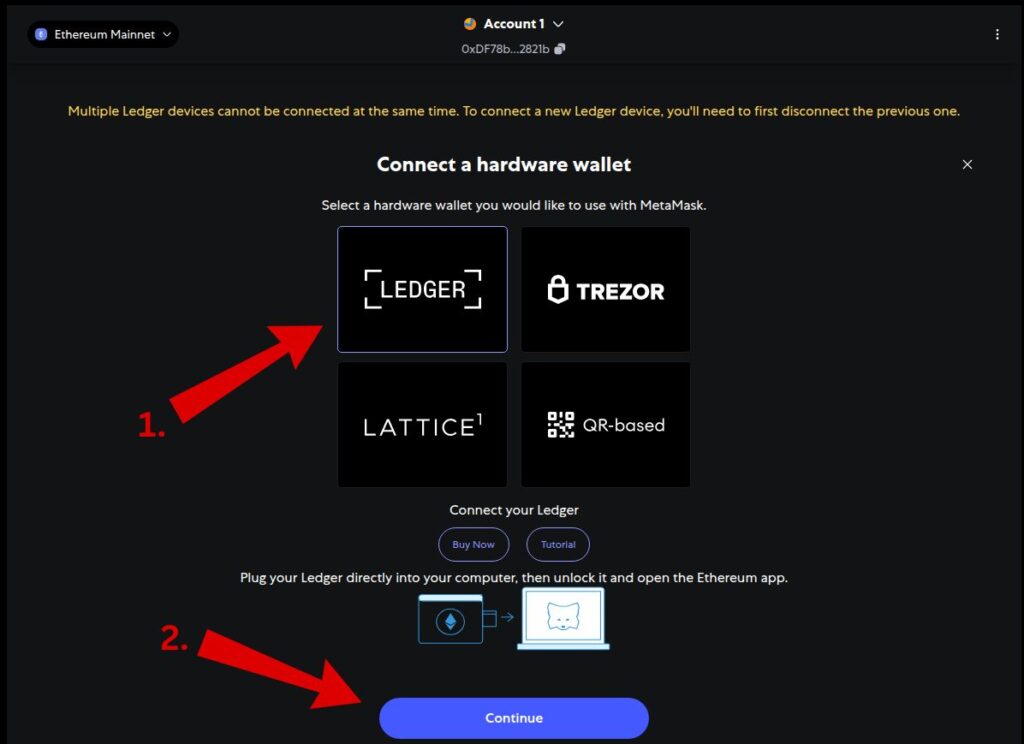
2. Select Ledger and Prepare Your Device
Choose Ledger from the available options (Arrow 1).
Before continuing:
- Plug your Ledger into your computer
- Enter your PIN code
- Open the Ethereum app on your Ledger
Once ready, click Continue (Arrow 2).
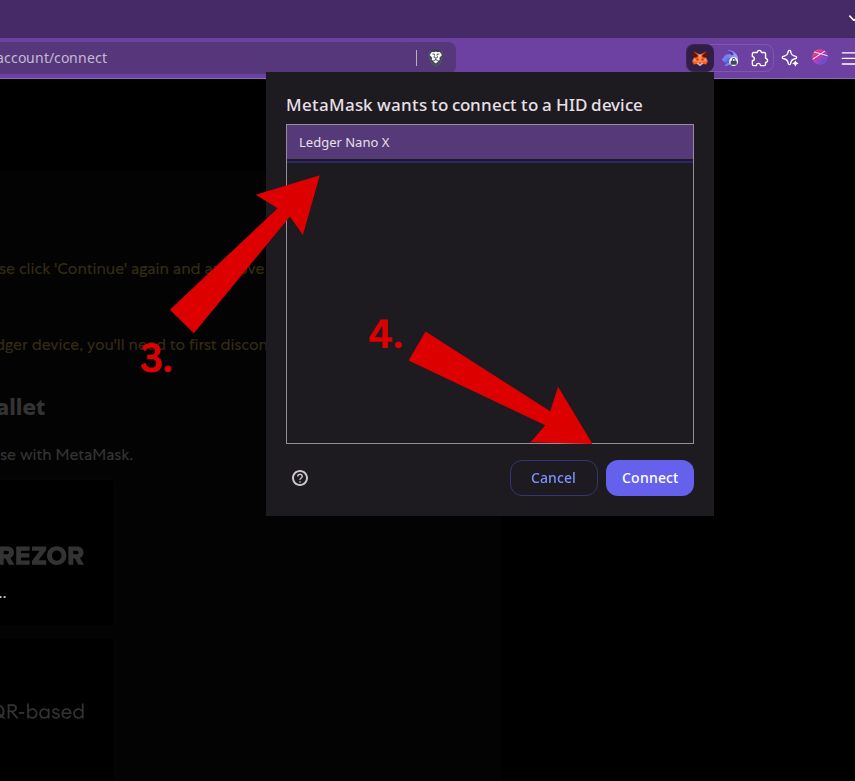
3. Select Your Ledger Device
MetaMask will now prompt a new window asking to connect to a HID device.
Click on your Ledger device name (like “Ledger Nano X”) to highlight it.
4. Click Connect
Once selected, click “Connect” to authorize the connection between MetaMask and your hardware wallet.
Make sure your Ledger is unlocked and the Ethereum app is open on the device at this point – otherwise the connection won’t go through.
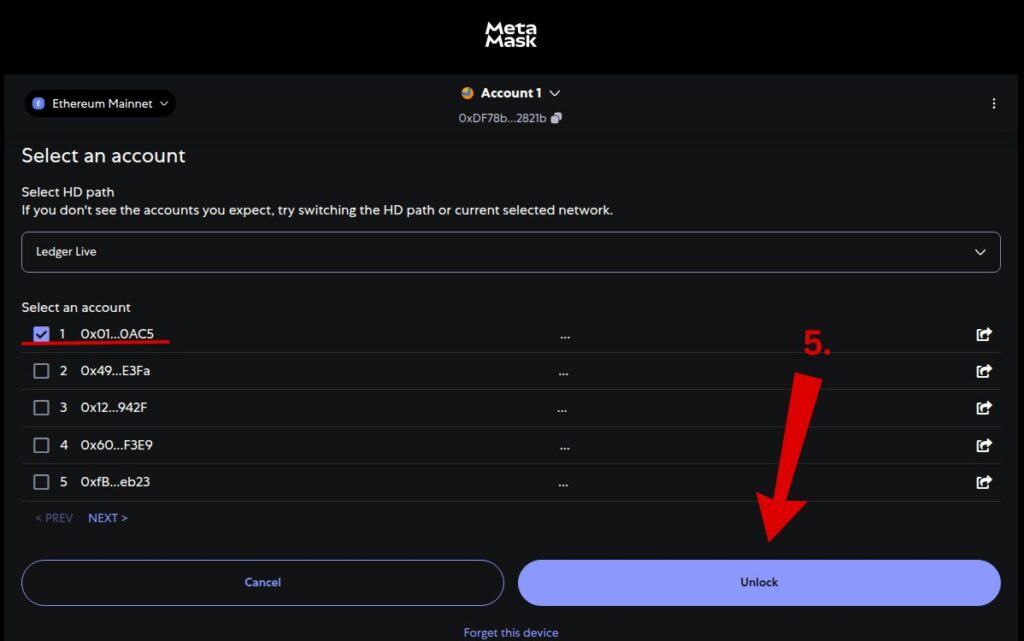
5. Select and Unlock Your Ledger Account
Choose the wallet address you want to import from your Ledger.
In this example, we’re selecting the first account (0x01…0AC5) by checking the box next to it.
Then click “Unlock” to finalize the import.
Your selected Ledger address will now be accessible directly from your MetaMask wallet interface.
6. Ledger Successfully Imported
And that’s it — your Ledger wallet is now fully connected to MetaMask.

You’ll see your Ledger address appear in the wallet dropdown just like any other account. From here, you can view your balance, manage assets, and interact with dApps – all while keeping your private keys safely stored offline.
Connecting Your Trezor to MetaMask
Using a Trezor hardware wallet with MetaMask brings an extra layer of security to your DeFi interactions. While MetaMask is powerful on its own, integrating it with Trezor ensures your private keys remain offline and safe.
This section walks you through the entire connection process step-by-step – from selecting your device to unlocking your address. If you’ve followed the Ledger instructions earlier, this will feel familiar.
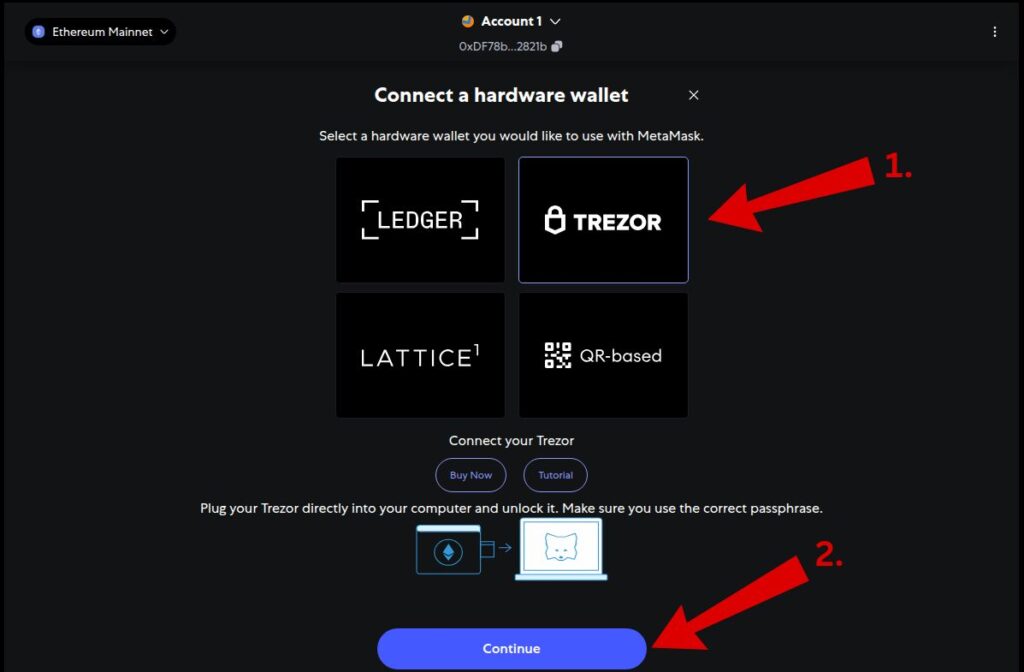
1. Select Trezor from the Hardware Wallet Menu
Just like with the Ledger setup, begin by heading to the “Add account or hardware wallet” menu from your account dropdown.
Step 1: This time, choose Trezor as your hardware wallet.
Step 2: Make sure your Trezor device is connected, unlocked, and ready – then click Continue to proceed.
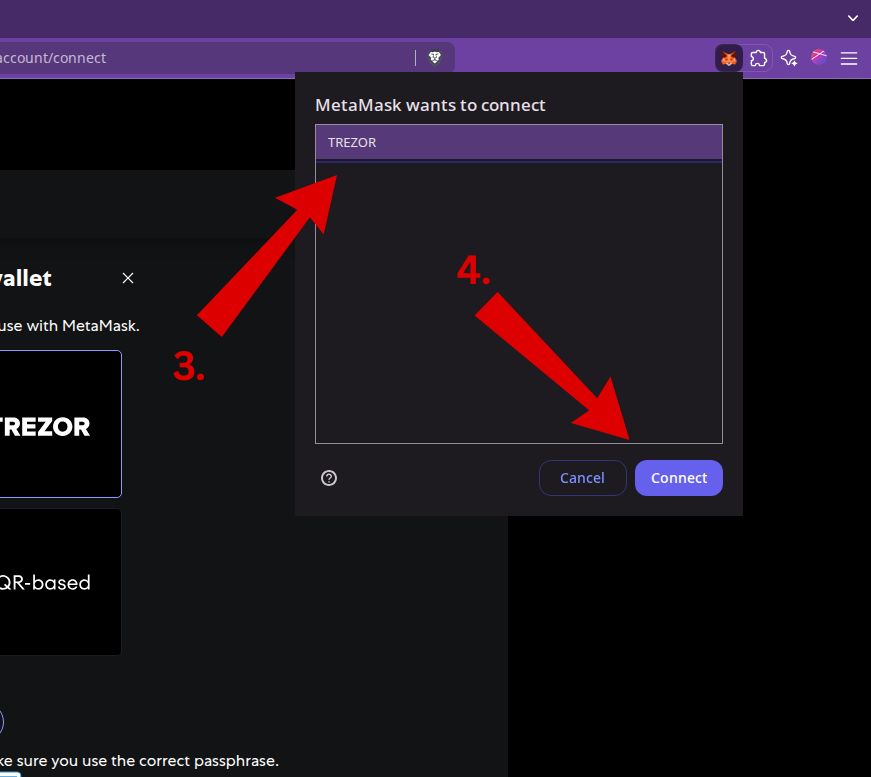
2. Connect Your Trezor Device
After clicking continue, MetaMask will prompt a device selection popup.
Step 3: Confirm your Trezor device is listed and selected.
Step 4: Click Connect to authorize MetaMask to interact with your Trezor.
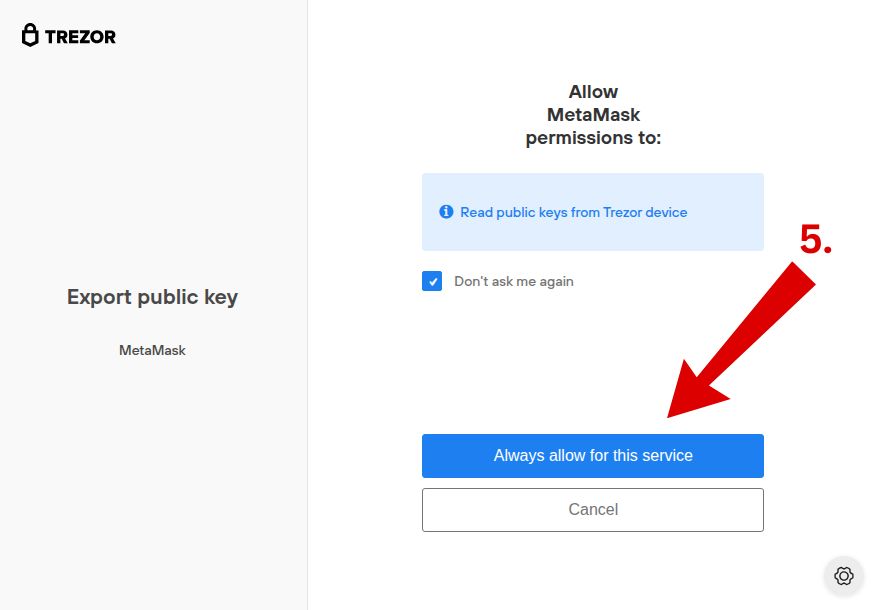
3. Allow MetaMask Access to Public Keys
MetaMask will ask for permission to read public keys from your Trezor.
Step 5: Click “Always allow for this service” to proceed.
Optionally, check “Don’t ask me again” if this is your main device and you want a smoother connection in the future.
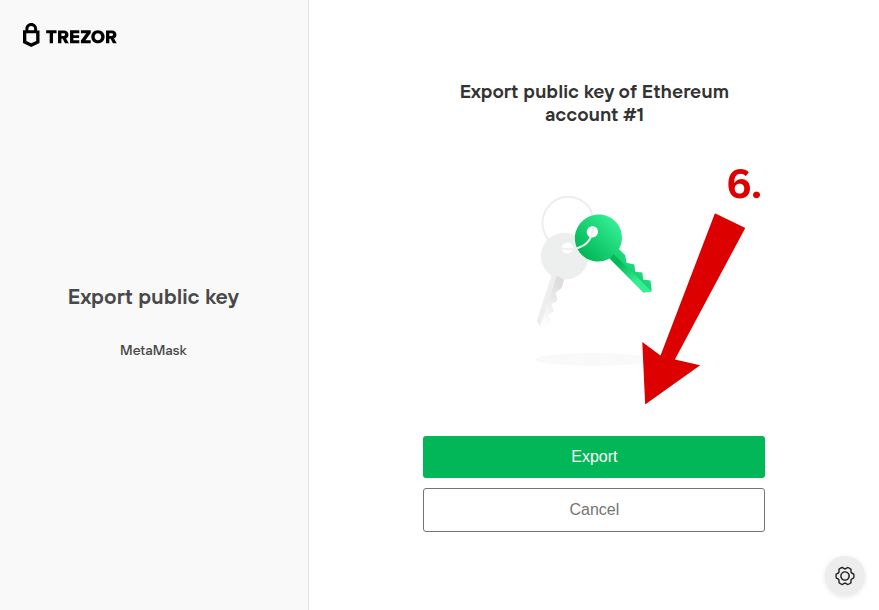
4. Export Your Ethereum Public Key
Trezor will now ask you to confirm that you're exporting the public key for your Ethereum account.
Step 6: Click “Export” to continue and share your wallet address with MetaMask.
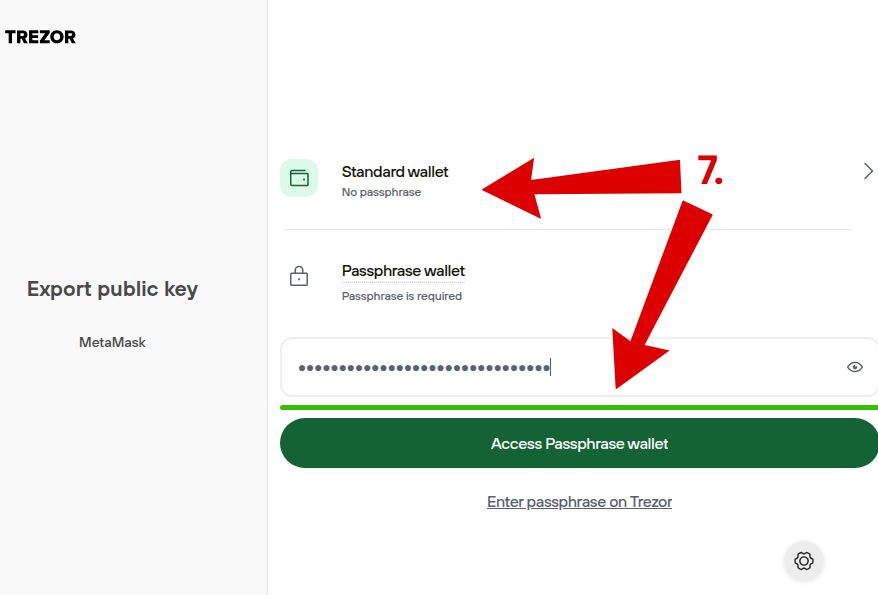
5. Choose Standard or Passphrase Wallet
At this stage, you can choose to import either your standard Trezor wallet or a hidden wallet protected by a passphrase.
Step 7:
- If you're new to using Trezor, select Standard wallet — this is the default wallet also visible in Trezor Suite.
- If you've previously created a hidden wallet, enter your passphrase and click Access Passphrase wallet.
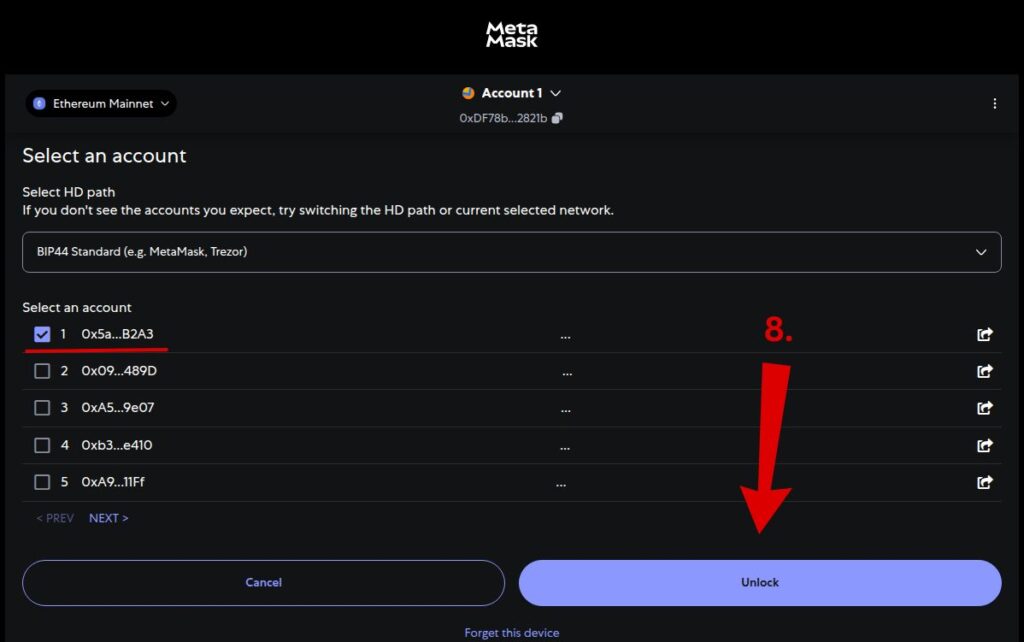
6. Select and Unlock Your Trezor Address
Once MetaMask retrieves your wallet addresses, select the one you want to import.
Step 8:
In our case, we’re importing the first address on the list. Click Unlock to finalize the connection – your Trezor wallet will now be accessible from MetaMask.
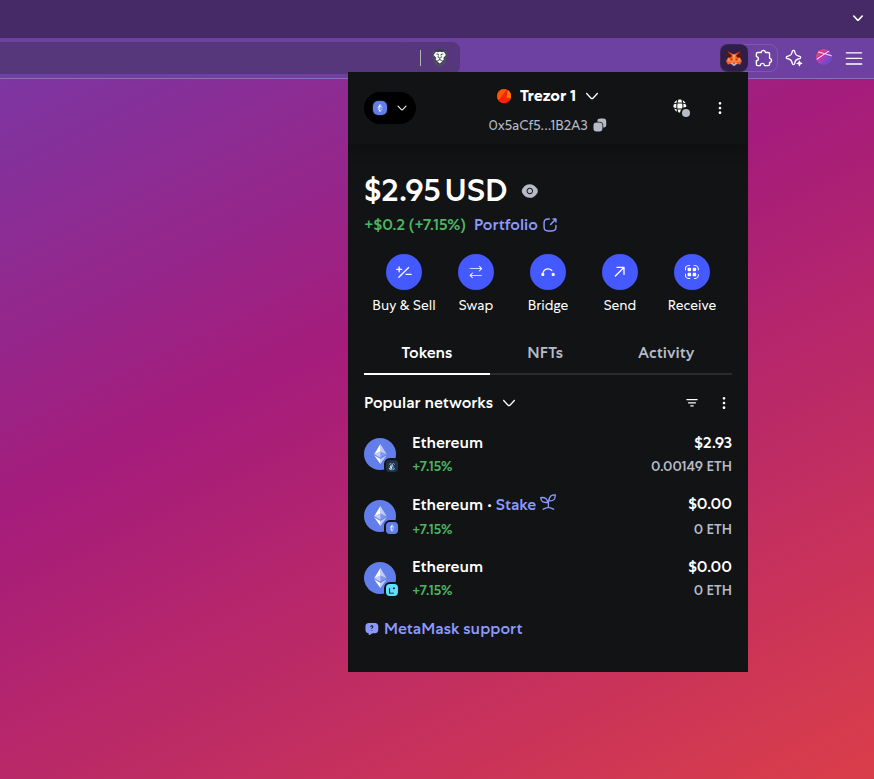
7. You’re In
That’s it – your Trezor wallet is now integrated into MetaMask.
You can seamlessly manage your hardware wallet address directly through the MetaMask interface, just like with any standard account.
Hardware Wallet Integration Recap
Whether you’re using Ledger or Trezor, MetaMask makes it easy to connect your hardware wallet and manage your DeFi activity with added security.
Here's a quick comparison:
| Feature | Ledger | Trezor |
| Connection Method | Direct USB (HID) | Direct USB (WebUSB) |
| Setup Flow | Choose → Connect → Unlock | Choose → Connect → Export → Unlock |
| Passphrase Support | Yes | Yes (hidden wallet option) |
| In-App View | Full MetaMask functionality | Full MetaMask functionality |
Using a hardware wallet with MetaMask gives you the convenience of a hot wallet, with the security of cold storage – ideal for regular DeFi users who take safety seriously.
How to Receive Crypto in MetaMask
To interact with DeFi apps or send transactions, you’ll first need to fund your wallet. Let’s walk through how to receive assets into your MetaMask account.
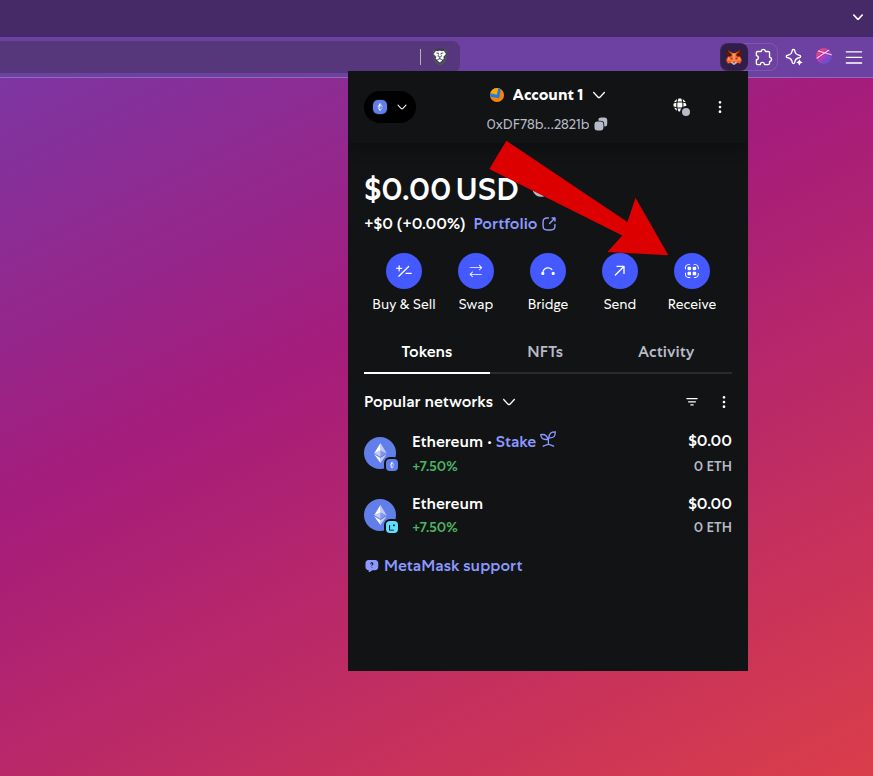
1. Access the Receive Screen
Start by opening your wallet and clicking the Receive button from the home screen. This is located next to the Send, Swap, and Bridge options.
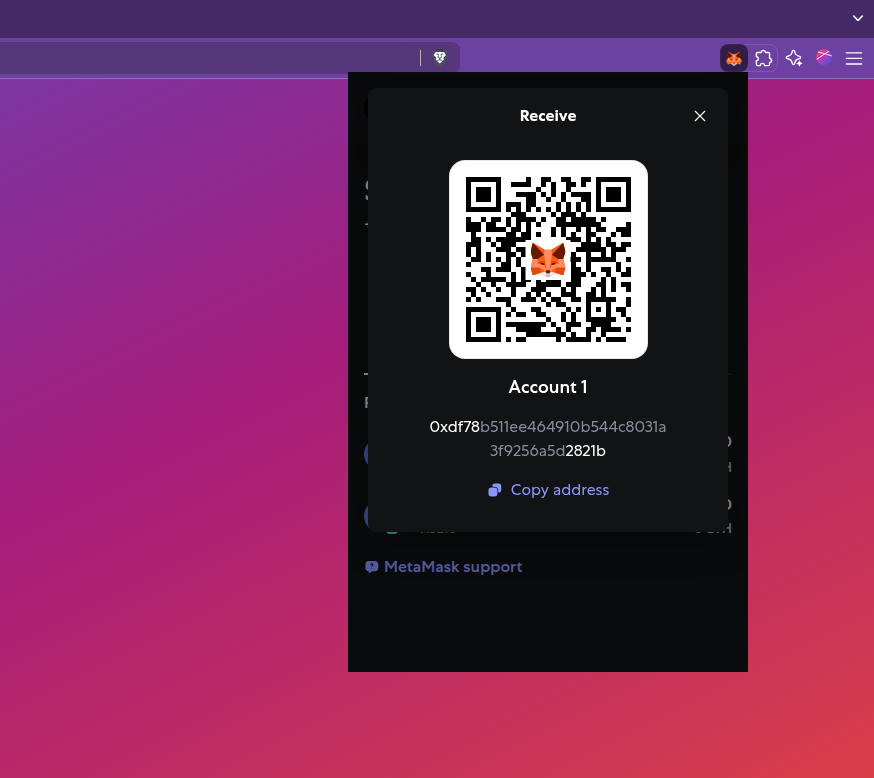
2. Copy Your Address or Use the QR Code
MetaMask will show your account’s QR code and Ethereum address. You can either scan the QR with a mobile device or click Copy address to share it manually.
This address works across all EVM networks, including Ethereum Mainnet, Arbitrum, Polygon, Base, and others – just make sure the sender is using the correct network on their end.
Once you've received some funds, you're ready to move forward. In the next section, we'll cover how to send assets safely from your MetaMask wallet.
Sending Crypto from MetaMask
Whether you're using a regular MetaMask wallet or one connected to a hardware device like Ledger or Trezor, the process for sending crypto is essentially the same. In this section, you’ll learn how to initiate and confirm a transaction, choose the right account, and review key details before hitting send.
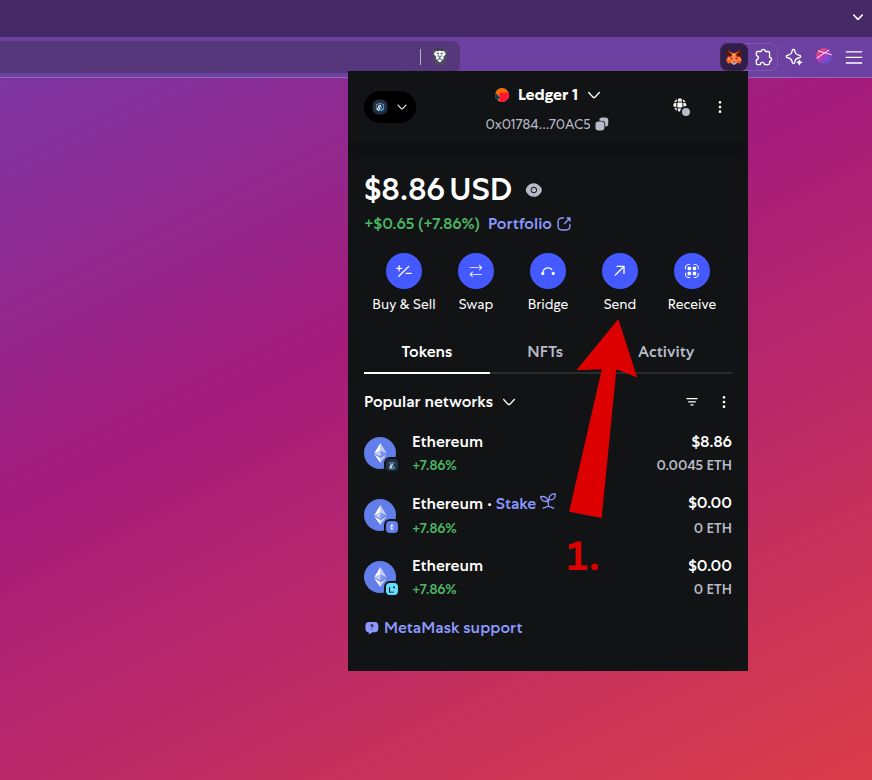
1. Open the Send Interface
From the main MetaMask wallet screen, click the Send button. This will launch the interface where you can choose the recipient and amount.
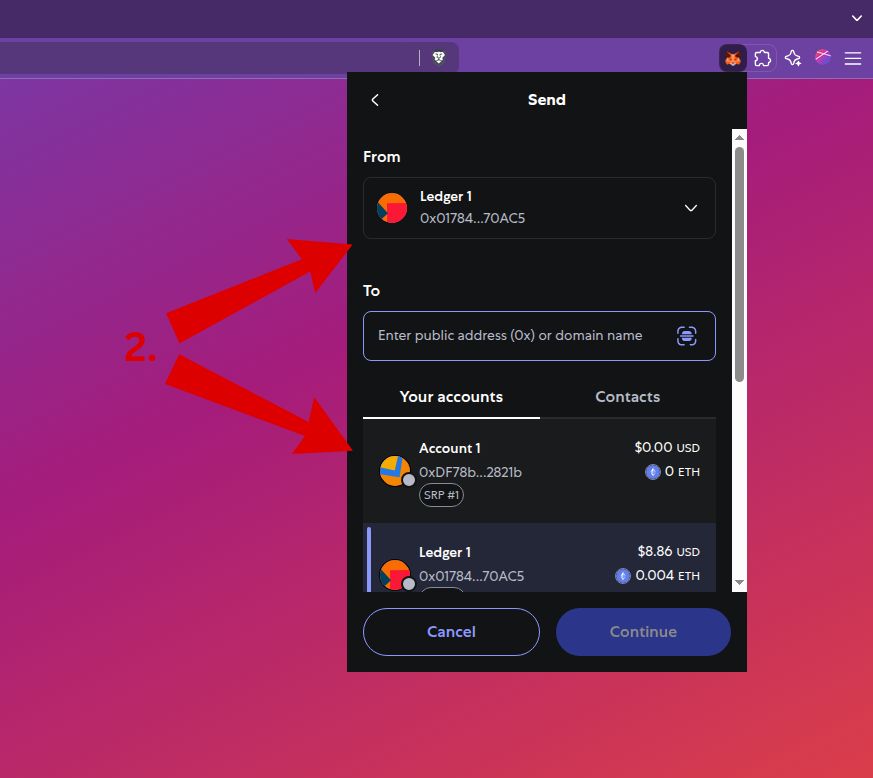
2. Choose Sender and Recipient
Select the wallet you want to send from at the top. Then, enter the recipient address manually or pick from your existing accounts below.
In this example, we’re sending from the Ledger 1 wallet to Account 1-the wallet we set up earlier in this guide.
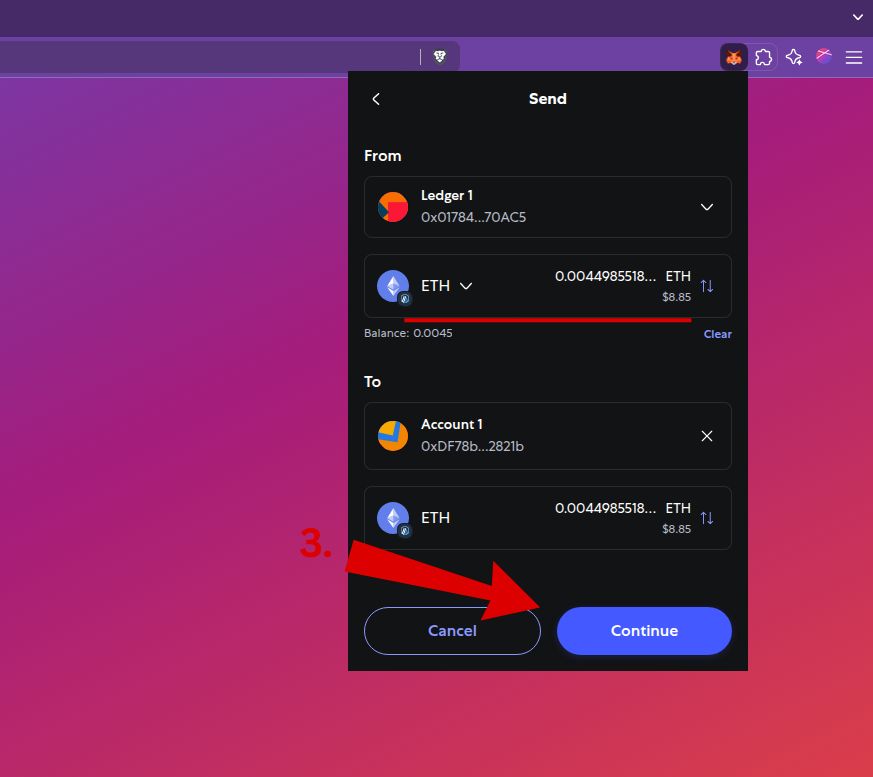
3. Select Asset and Amount
Pick the token you want to send (in this case, ETH), enter the amount, and click Continue.
Make sure you leave a little ETH for gas if you're using the Ethereum network.
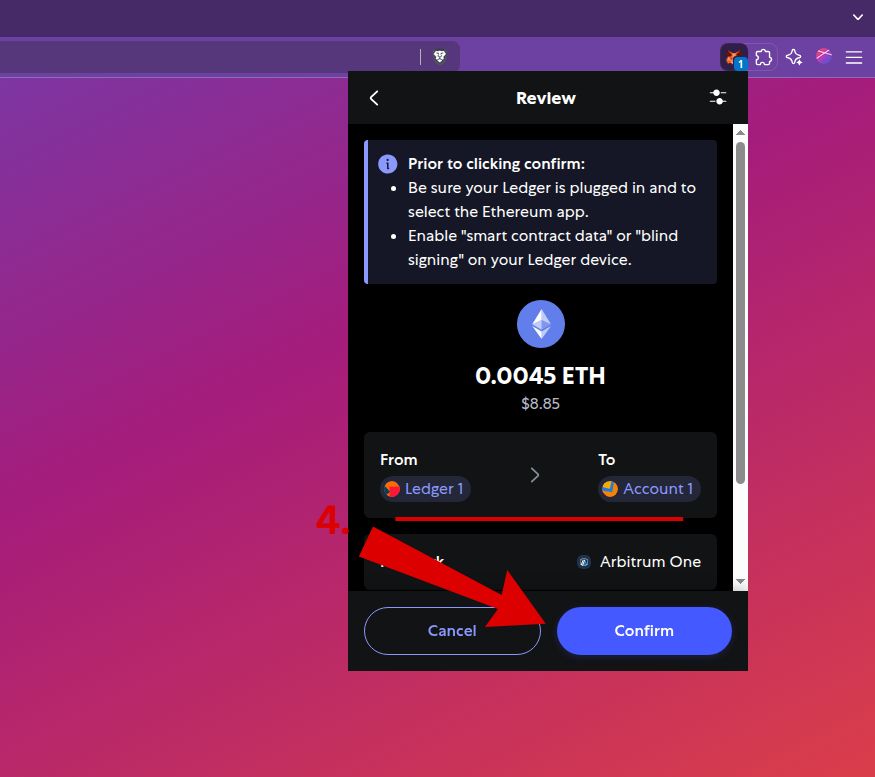
4. Confirm the Transaction
Double-check all details—amount, recipient address, and network.
Click Confirm to proceed.
If you're using a hardware wallet like Ledger or Trezor, you'll now need to approve the transaction on the device. If not, MetaMask will broadcast it immediately.
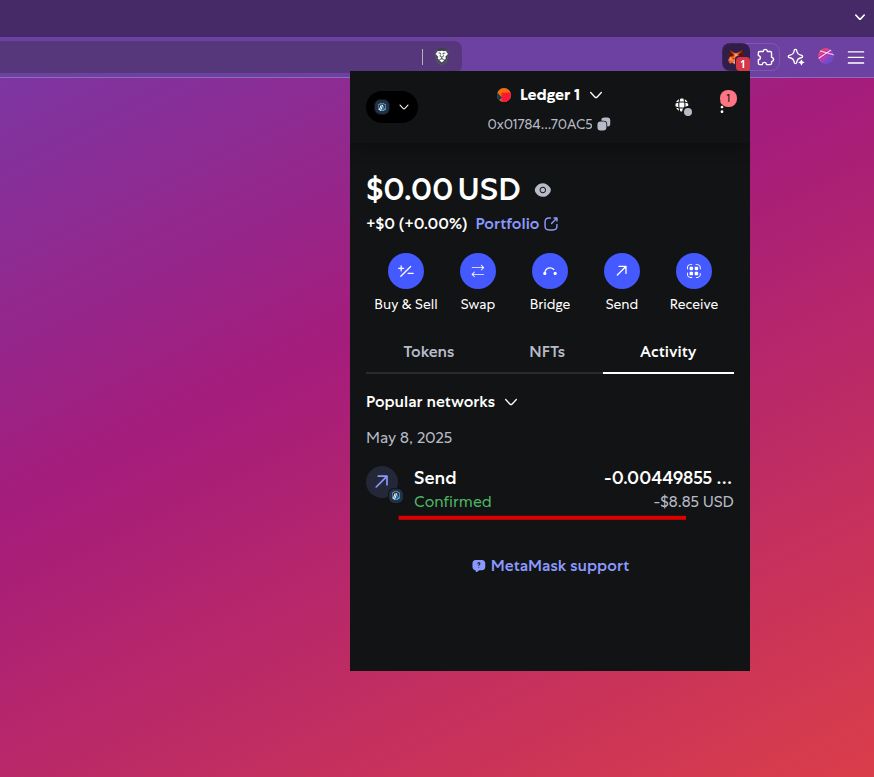
5. Transaction Confirmed
Once the transaction is confirmed, it will appear in your Activity tab.
If you have notifications enabled, MetaMask will alert you when it's completed. In our example, we’ve successfully sent ETH from our Ledger wallet to the original MetaMask account created earlier.
That’s it! You’ve now sent a transaction using MetaMask. Whether you're sending to a friend or moving assets between your own wallets, the steps are always the same. Next, let’s take a look at how to swap tokens directly inside MetaMask.
Swapping Tokens in MetaMask
MetaMask also allows you to swap tokens directly inside the wallet using a built-in aggregator. This is especially useful when you need to quickly convert one token to another without using an external DEX. The interface is simple and the steps are almost identical whether you're on Ethereum, Arbitrum, or any other supported network.
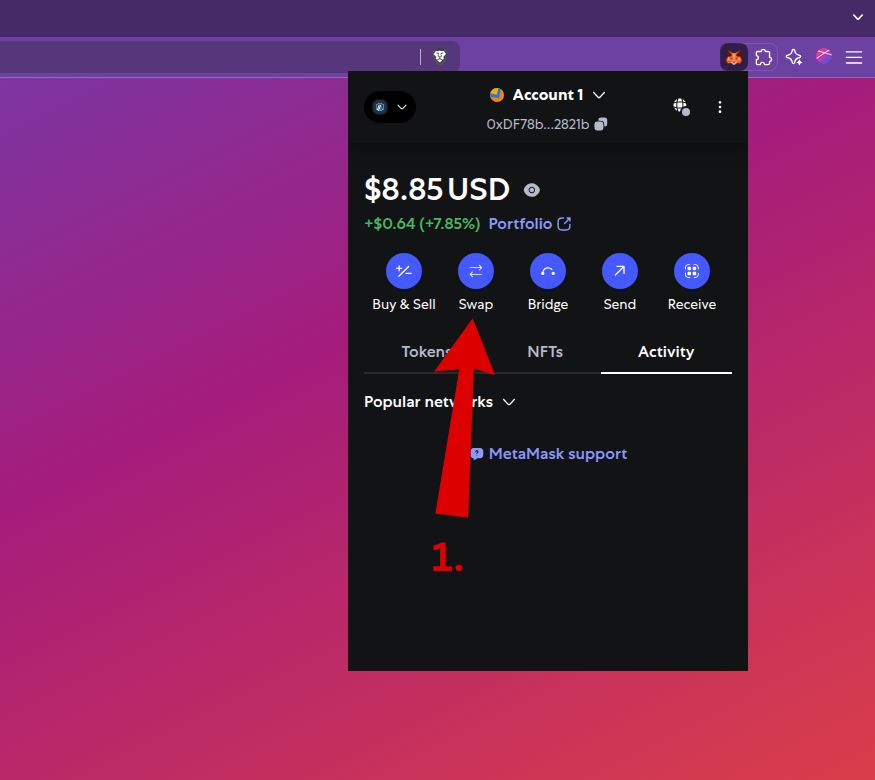
1. Open the Swap Interface
From your wallet's main screen, click the “Swap” button. This will open the built-in swap interface.
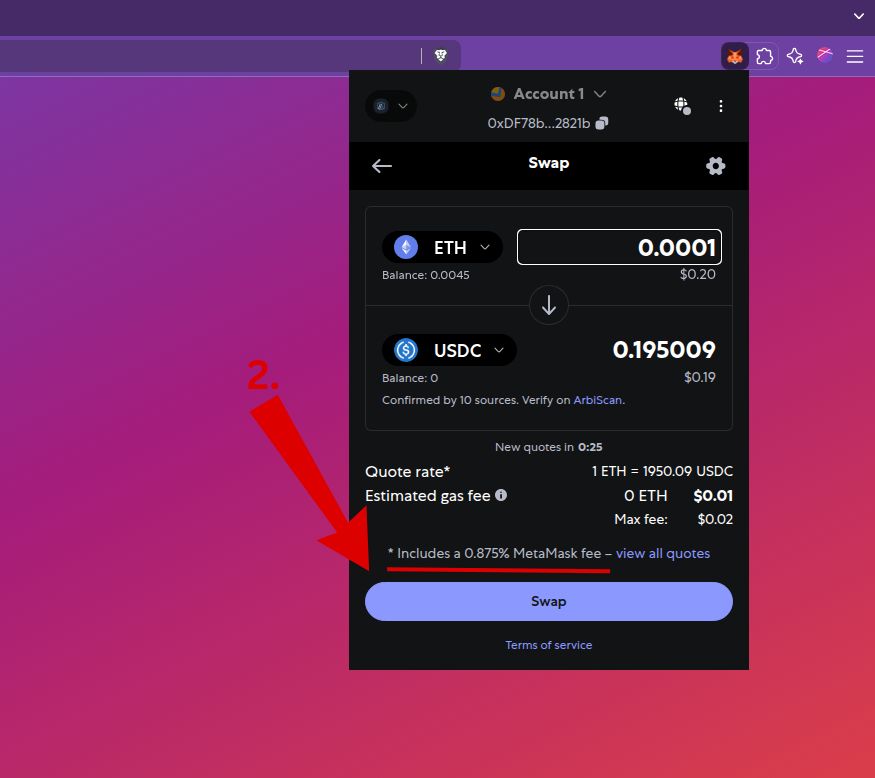
2. Choose Tokens and Amount
Now choose which token you want to swap from and to. In our example, we are swapping a small amount of ETH for USDC.
You'll see the quoted rate, estimated gas fee, and a reminder that MetaMask charges a 0.875% fee for swaps.
Once you're happy with the numbers, click “Swap” to proceed.
3. Transaction Confirmation
Once the transaction confirms, you’ll see a success screen. You can click the explorer link to view your swap on-chain, or simply close the screen. Your new tokens will now appear in your wallet balance.

Note: While MetaMask's swap feature is convenient, it includes a service fee. If you're looking for potentially better rates or lower fees, consider exploring other DEX aggregators.
For more information on alternative DEX aggregators that might offer more competitive rates or lower fees, you can explore our DEX Aggregators Overview.
Bridging Assets Between Networks
MetaMask also includes a built-in bridge feature, making it easy to move assets across supported blockchains without needing an external service. This is especially helpful when exploring apps on networks like Arbitrum, Base, or Polygon.
Just like swaps, the bridge feature uses third-party liquidity and includes a 0.875% service fee baked into the rate. If you're looking for fee-free alternatives or just want to compare rates, check out our complete bridging guide.
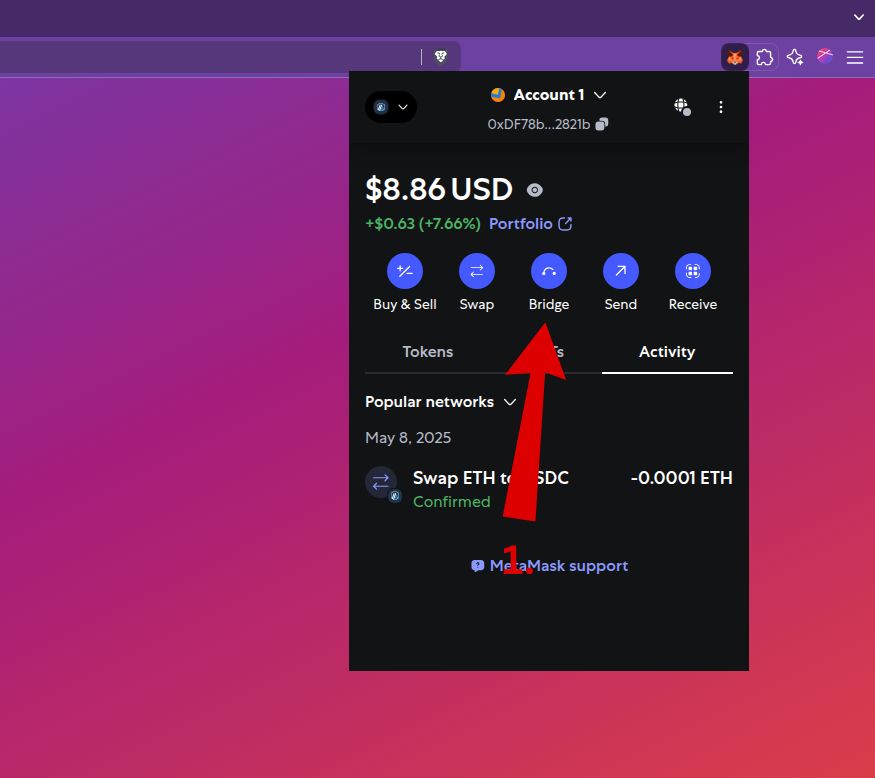
Step 1:
On your wallet home screen, click the “Bridge” button in the top menu. This will open the bridging interface.
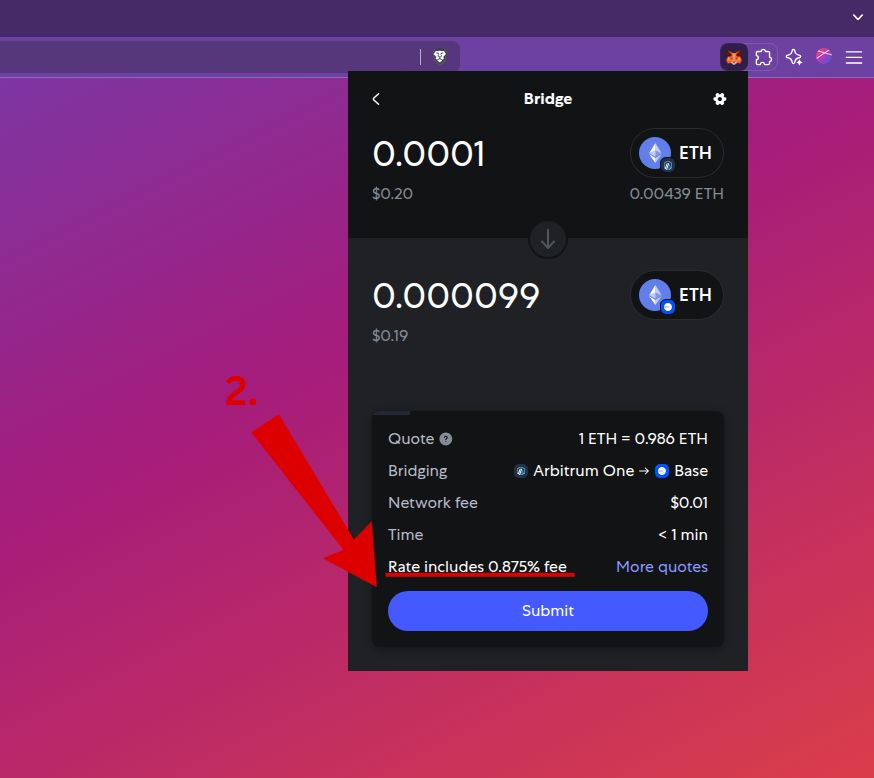
Step 2:
Choose the token and amount you'd like to send, and then select the network you want to bridge to. MetaMask will automatically estimate the fee and time.
Once everything looks good, click “Submit” to start the transaction.
Don’t forget—MetaMask will prompt you to confirm the transaction in your wallet or device.
Conclusion
You’ve now set up MetaMask, secured your wallet, and practiced the basics—receiving, sending, swapping, and even bridging assets. Whether you’re using a hardware wallet or not, you’ve taken the essential first steps toward self-custody and using crypto the way it’s meant to be used.
Quick recap:
- Keep your seed phrase offline and private
- Always verify addresses and transaction details
- Use a hardware wallet for added protection when possible
But this is just the beginning.
If you’re ready to go deeper, explore protocols, earn yield, and truly master DeFi—your next stop is here:
👉 Unleash DeFi: A Complete Guide from Start to Mastery
This is where things get powerful.
FAQs (Frequently Asked Questions)
What is MetaMask and why is it essential for DeFi users?
MetaMask is a non-custodial Ethereum wallet that provides users with secure asset management and seamless interaction with decentralized applications (dApps). It is essential for DeFi users because it serves as the default wallet for Ethereum and compatible networks, enabling easy access to a wide range of DeFi protocols.
How do I install MetaMask on my browser?
To install MetaMask on your browser, visit the official MetaMask website at metamask.io and click the ‘Get MetaMask' button. You will be redirected to your browser's extension store, such as Brave or Chrome Web Store. Add the extension, confirm permissions, and follow the prompts to complete installation securely.
What steps are involved in setting up a new MetaMask wallet?
Setting up a new MetaMask wallet involves agreeing to the Terms of Use, choosing privacy preferences, creating a strong password, securing your wallet by backing up your unique 12-word Secret Recovery Phrase, confirming this phrase to ensure accuracy, and finalizing the setup to activate your wallet.
Can I import an existing Ethereum wallet into MetaMask? If so, how?
Yes, you can import an existing Ethereum wallet into MetaMask by clicking your account name on the dashboard, selecting ‘+ Add account or hardware wallet,' choosing ‘Secret Recovery Phrase,' entering your 12-word phrase carefully, and then viewing your imported wallet once successfully added.
How do I connect a Ledger or Trezor hardware wallet to MetaMask?
To connect a Ledger or Trezor hardware wallet to MetaMask, access the hardware wallet menu via your account icon. Select either ‘Ledger' or ‘Trezor,' prepare and connect your device when prompted, authorize access to public keys, choose the desired wallet address from your device, and finalize the connection to integrate your hardware wallet securely with MetaMask.
What are the basic steps for sending and receiving tokens using MetaMask?
To receive tokens in MetaMask, open your wallet and click ‘Receive' to view your Ethereum address or QR code for sharing. To send tokens, click ‘Send,' select the sender account and enter the recipient's address, choose the token and amount to send, then confirm the transaction details before completing the transfer securely.