Introduction
Combining an extension wallet like Rabby Wallet with a hardware wallet provides enhanced security for managing your digital assets in DeFi. This method ensures your private keys remain offline, protecting them from potential online threats. If you haven't already, read our Rabby Wallet setup guide to get started.
What are Hardware Wallets?
Hardware wallets are physical devices designed to securely store cryptocurrency private keys offline. This offline storage protects your keys from potential online threats such as hacking, phishing, and malware attacks. By keeping your private keys offline, hardware wallets provide a high level of security for managing and transacting with your digital assets.
Which Hardware Wallets are Suitable for DeFi?
For DeFi, it's crucial to use hardware wallets that support a wide range of cryptocurrencies and can seamlessly integrate with DeFi platforms. For a detailed list of the best web3-compatible DeFi hardware wallets, refer to our comprehensive listicle of wallets.
Our Recommended Hardware Wallets for DeFi
Here is a list of our top recommendations for the best DeFi wallets:
- GridPlus: Focuses on security and ease of use for DeFi transactions.
- Trezor: Known for its user-friendly interface and robust security features.
- Ledger: Offers extensive support for various cryptocurrencies and DeFi applications.
This article will guide you through the process of using these hardware wallets with DeFi, starting with our #1 recommendation, GridPlus.
Step-by-Step Guide: Using GridPlus with Rabby Wallet
Integrating a GridPlus hardware wallet with Rabby Wallet provides enhanced security for your DeFi activities. GridPlus wallets, known for their advanced security features and user-friendly interface, ensure that your private keys remain secure while interacting with DeFi platforms. This section will guide you through the setup and connection process, enabling you to leverage the full potential of GridPlus with Rabby Wallet.
Setting Up Your GridPlus Hardware Wallet
- Unboxing and Initial Setup:
- Unbox your GridPlus Lattice1 hardware wallet and connect it to a power source using the provided cables.
- Follow the instructions on the device to power it on and initiate the setup process.
- Connecting to the Internet:
- Connect your Lattice1 device to your home Wi-Fi network by following the on-screen instructions.
- Ensure the connection is secure and stable to avoid interruptions during the setup process.
- Creating a New Wallet:
- Choose the option to create a new wallet on your GridPlus device.
- Follow the device prompts to generate a new wallet.
- Securing Your Seed Phrase:
- Write down the 24-word seed phrase displayed on the Lattice1 screen. This phrase is crucial for recovering your wallet in case the device is lost or damaged.
- Store the seed phrase in a secure, offline location to protect it from potential online threats.
- Setting Up a PIN:
- Set up a PIN on your Lattice1 device to add an additional layer of security. This PIN will be required every time you access the device.
Following these steps ensures that your GridPlus Lattice1 hardware wallet is set up securely, providing a robust foundation for managing your DeFi assets with Rabby Wallet. For further details and troubleshooting, always refer to the official GridPlus documentation.
Next, we will guide you through the process of connecting your GridPlus wallet to Rabby Wallet.
Connecting GridPlus Lattice1 to Rabby Wallet
1. Access Hardware Wallet Integration:
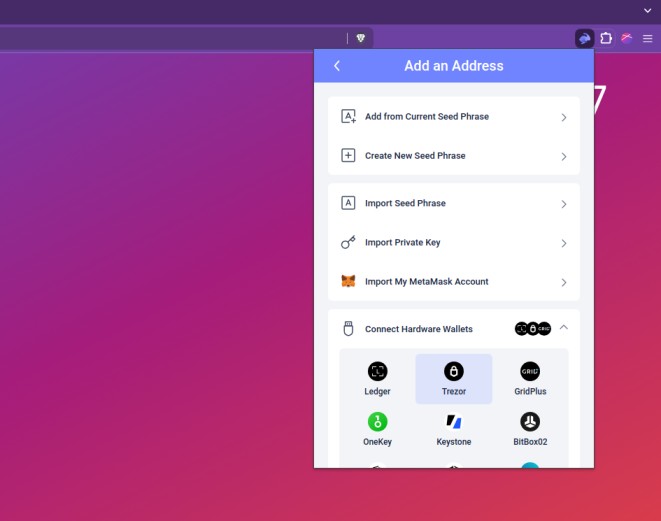
- Open Rabby Wallet and navigate to the “Add an Address” section.
- Select “Connect Hardware Wallets” and choose “GridPlus.”
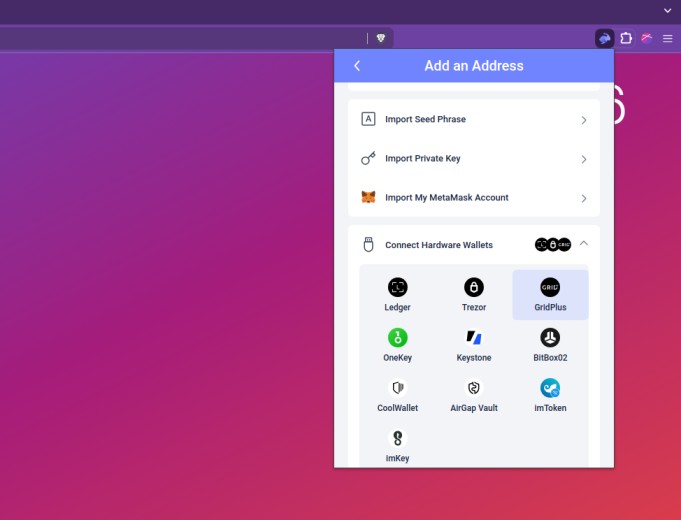
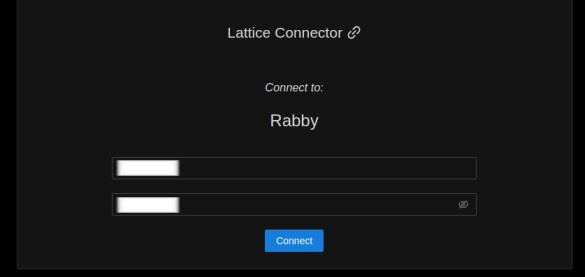
2. Initiate Connection:
- Enter the pairing information for your GridPlus Lattice1 device.
- Provide the Device ID, chosen password and click “Connect.”
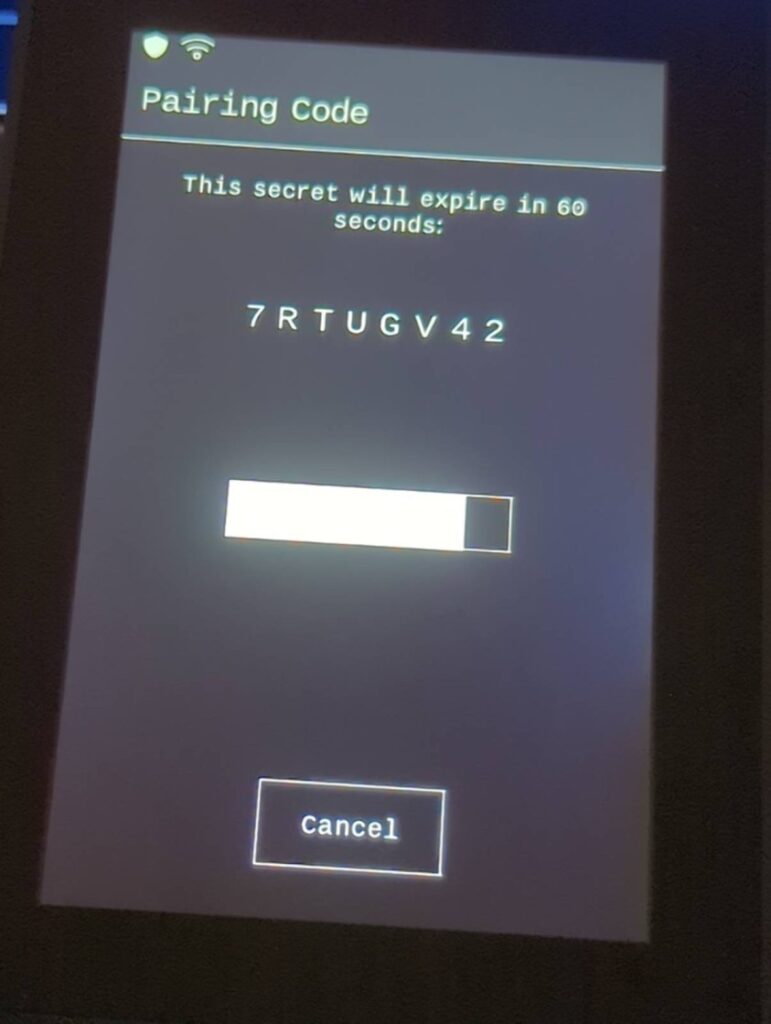
3. Authorize Pairing:
- On your GridPlus Lattice1 device, you will see a pairing code.
- Enter this code on Rabby Wallet to authorize the connection.
4. Manage Accounts:
- Once connected, you can manage your GridPlus addresses within Rabby Wallet.
- Select the addresses you want to import and manage.
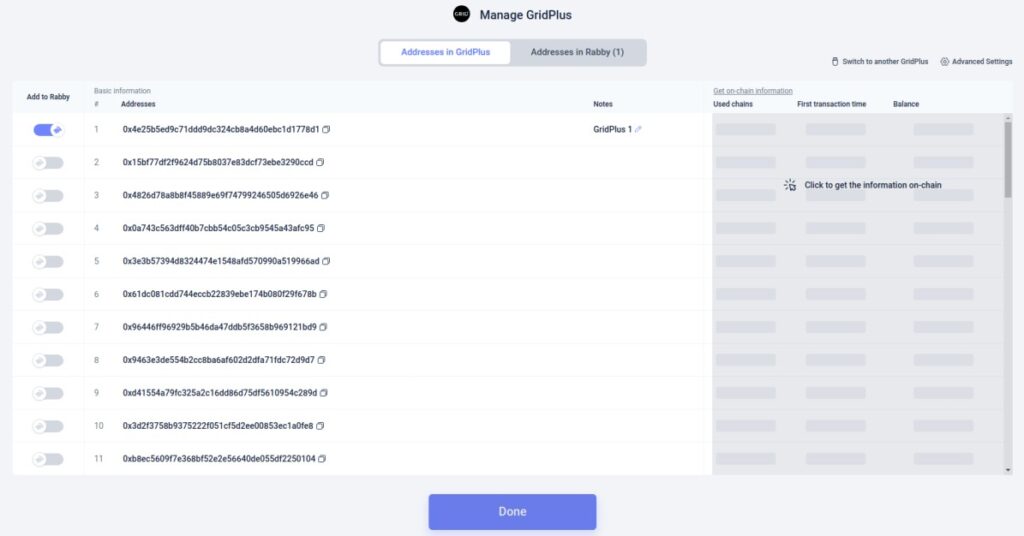
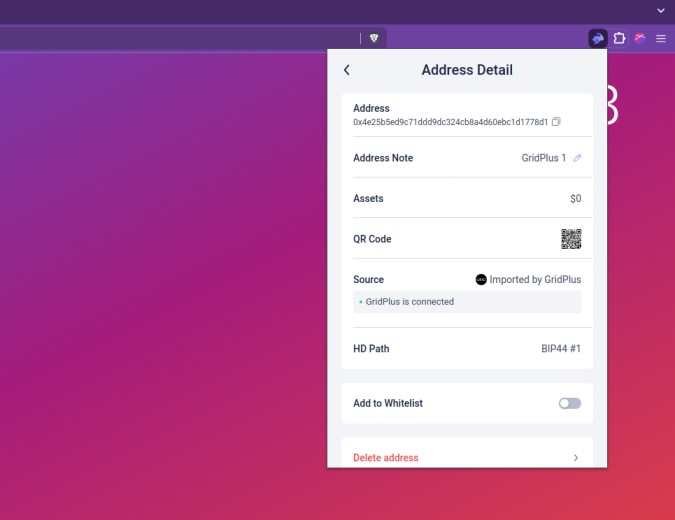
5. View Address Details:
- View and edit details for the imported addresses.
- Ensure that every transaction using the imported GridPlus address will require physical authorization from the GridPlus device, adding an additional layer of security.
Confirming Transactions Using GridPlus in Rabby Wallet
Once you have connected your GridPlus wallet to Rabby Wallet, confirming transactions is a straightforward process that ensures the security of your assets. Here's how it looks:
1. Initiating the Transaction:
- When you are ready to perform a transaction, such as swapping tokens, you will see the transaction details within Rabby Wallet. For example, swapping 0.0005 ETH for 1.9029 USDT on the Arbitrum chain.
- Click on “Begin signing process” to start the transaction approval.

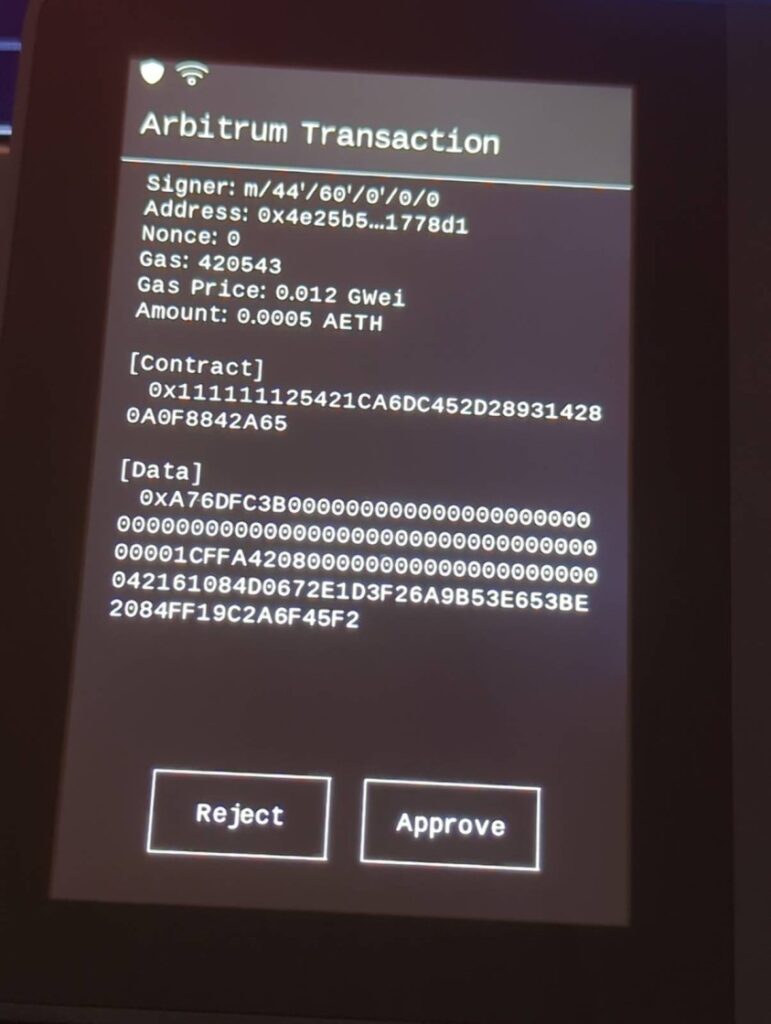
2. Approving the Transaction on GridPlus:
- The transaction details will be displayed on your GridPlus device, including the signer, address, nonce, gas price, and the amount of the transaction.
- Review the transaction details carefully to ensure they are correct.
- If everything looks good, approve the transaction by selecting “Approve” on your GridPlus device. If something is off, you can reject the transaction.
By following these steps, you can securely authorize transactions using your GridPlus hardware wallet in Rabby Wallet. This ensures an additional layer of security for your DeFi activities, requiring physical confirmation for each transaction.
This section provides a clear understanding of how to securely confirm transactions using a GridPlus Lattice1 hardware wallet integrated with Rabby Wallet. The next section will guide you through the setup process for another recommended hardware wallet, Trezor.
Step-by-Step Guide: Using Trezor with Rabby Wallet
Integrating a Trezor hardware wallet with Rabby Wallet ensures that your private keys remain secure while you interact with DeFi platforms. This guide will walk you through the process of setting up your Trezor device, connecting it to Rabby Wallet, and managing your assets securely.
Setting Up Your Trezor Hardware Wallet
1. Connect your Trezor device:
- Plug your Trezor Model T into your computer using the provided USB cable.
- Follow the on-screen instructions displayed on the Trezor device and your computer.
- Visit the official Trezor website if prompted to download any necessary software.
2. Setup process:
- Choose the option to create a new wallet on your Trezor Model T.
- Follow the hardware manufacturer's instructions carefully to ensure proper setup.
3. Securely store your seed phrase:
- Write down the 12 or 24-word seed phrase provided by Trezor. This seed phrase is your backup in case your device is lost or damaged.
- Store the seed phrase in a secure location, avoiding digital storage to prevent potential hacking.
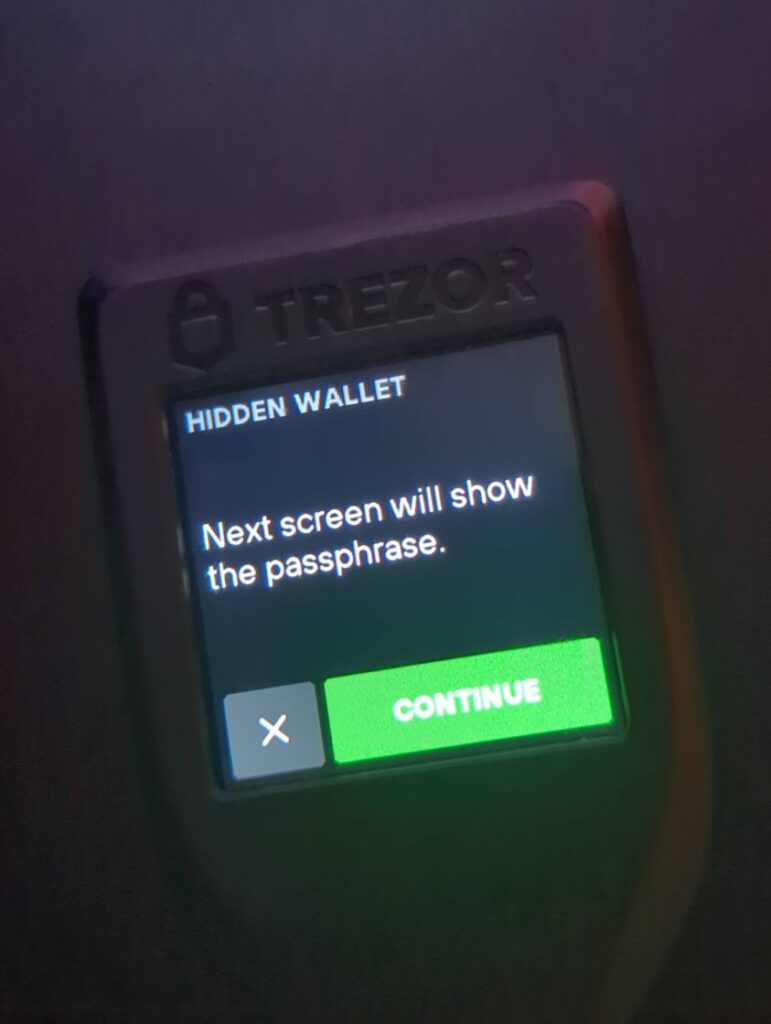
- Trezor Model T also offers the option to set up a hidden wallet using a passphrase for added security. Choose a secure passphrase and remember it, as it cannot be recovered if forgotten.
Following these steps ensures that your Trezor Model T is set up securely, providing a robust foundation for managing your DeFi assets with Rabby Wallet. Always refer to the official Trezor setup guide for detailed instructions and support.
Connecting Trezor to Rabby Wallet
1. Access Hardware Wallet Integration
- Open Rabby Wallet: Click on the Rabby Wallet icon in your browser toolbar.
- Navigate to Settings: Select “Connect Hardware Wallet” from the settings or wallet options.
2. Select Trezor
- Choose Trezor: Pick Trezor from the list of supported hardware wallets and follow the prompts to connect.
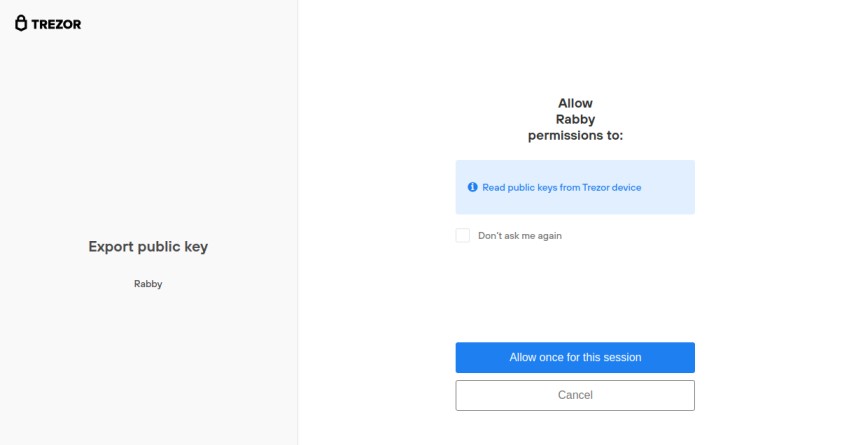
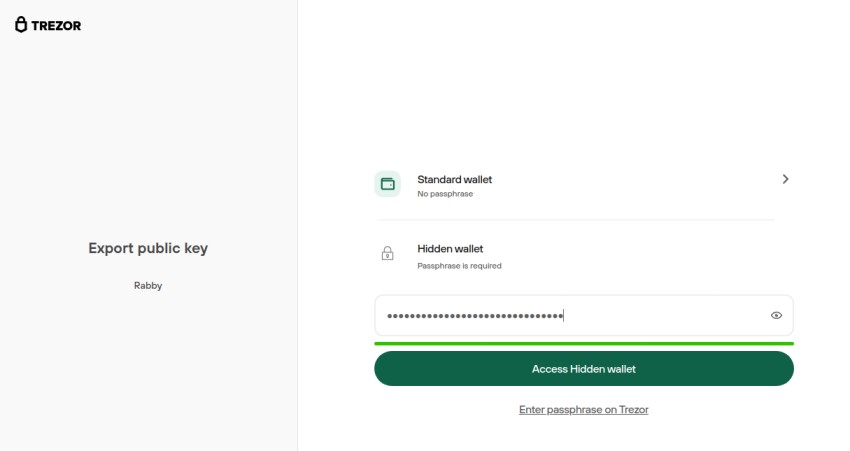
3. Export Public Key
- Select Wallet Type: Choose either the standard wallet or hidden wallet with an extra passphrase.
4. Authorize Connection
- Approve Connection: Confirm the connection on your Trezor device by physically approving the authorization.
5. Manage Accounts
- Manage Assets: Once connected, manage your assets using Rabby Wallet while ensuring your private keys remain secure on your Trezor.
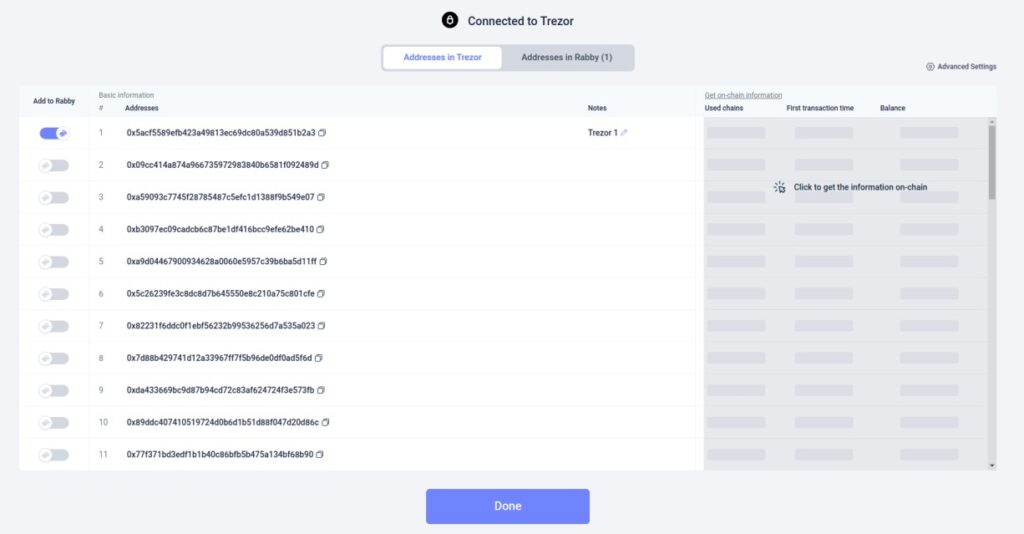
6. Imported Addresses and Editing
- View and Manage: You can view and manage the imported Trezor addresses within Rabby Wallet. Select the address you want to manage and click to view details or edit.
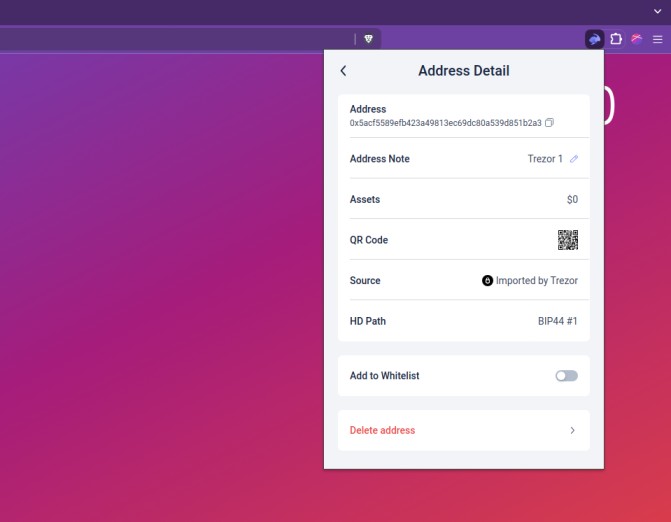
From now on, every transaction using this imported Trezor address will require physical authorization from the Trezor device, ensuring an additional layer of security for your DeFi activities.
Confirming Transactions Using Trezor in Rabby Wallet
Once you've successfully connected your Trezor hardware wallet to Rabby Wallet, confirming transactions becomes a straightforward yet highly secure process. This section illustrates how transactions are confirmed using Trezor, ensuring an additional layer of security for your DeFi activities.
Step-by-Step Confirmation Process
1. Initiate the Transaction:
- When you start a transaction in Rabby Wallet, you will see a summary of the transaction details on the Rabby interface. This includes the amount, recipient address, and other relevant information.
- Review the transaction summary in Rabby Wallet to ensure all details are correct. If everything looks good, proceed to the next step.
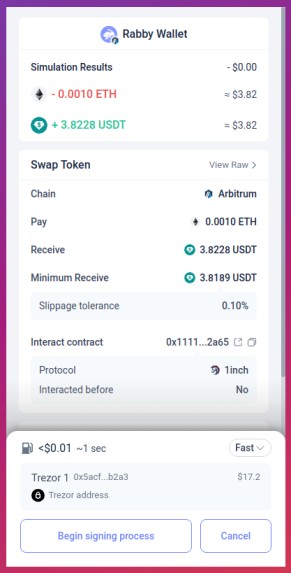
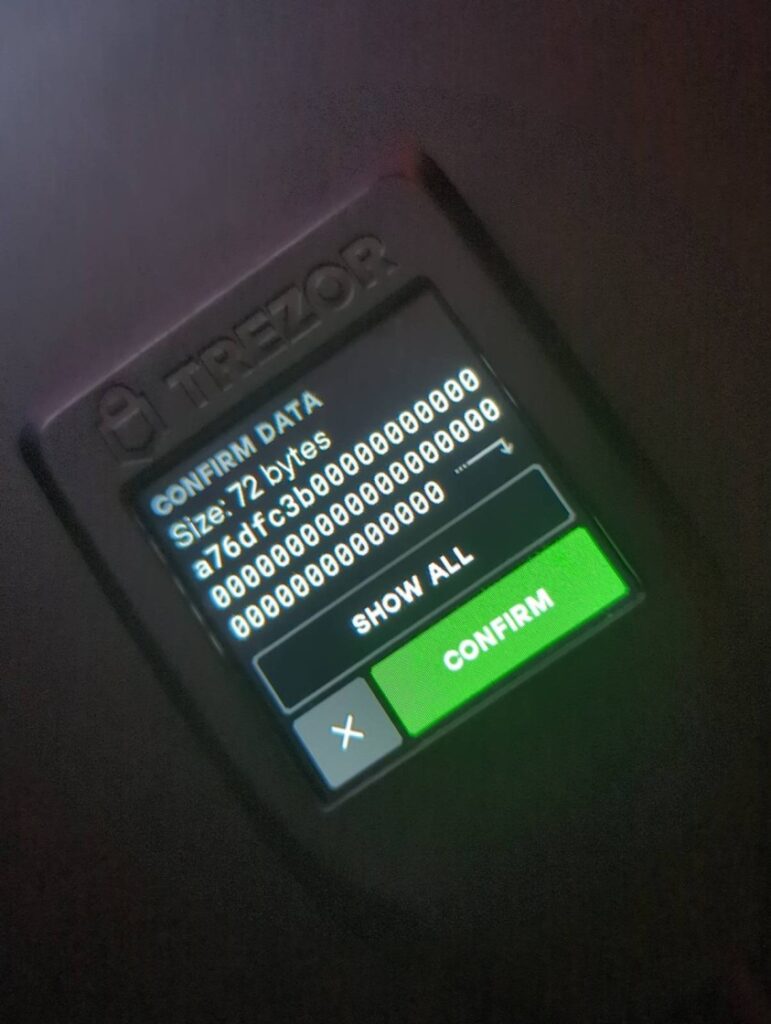
2. Sign with Trezor:
- Trezor will prompt you to confirm the transaction details. On the Trezor screen, you will see the transaction data displayed in detail.
- Verify the transaction data on your Trezor device. If everything matches the information you reviewed in Rabby Wallet, confirm the transaction by pressing the appropriate button on your Trezor.
By following these steps and utilizing the secure confirmation process with Trezor, you ensure that your DeFi transactions are executed with the highest level of security. This method helps protect your assets from unauthorized transactions and potential online threats.
This section provides a clear understanding of how to securely confirm transactions using a Ledger hardware wallet integrated with Rabby Wallet. The next section will guide you through the setup process for another recommended hardware wallet, Ledger.
Step-by-Step Guide: Using Ledger with Rabby Wallet
Integrating your Ledger hardware wallet with Rabby Wallet significantly enhances the security of your DeFi activities. By combining the robust security features of Ledger with the user-friendly interface of Rabby Wallet, you can safely manage your digital assets. In this section, we'll guide you through the process of connecting your Ledger device to Rabby Wallet, ensuring your transactions are secure and efficient.
Setting Up Your Ledger Hardware Wallet
1. Install Ledger Live:
- Download and install the Ledger Live app on your computer from the official Ledger website.
- Open the Ledger Live app and select your Ledger device (e.g., Nano X).
2. Initialize Your Ledger Device:
- Connect your Ledger device to your computer using the provided USB cable.
- Follow the on-screen instructions on Ledger Live.
- Choose to set up as a new device.
- Select a PIN code for your device. This PIN will be required each time you access your Ledger wallet.
3. Backup Your Recovery Phrase:
- Ledger will provide you with a 24-word recovery phrase. Write it down on the recovery sheet provided.
- Store this recovery phrase in a secure, offline location. It is crucial for recovering your wallet if your Ledger device is lost or damaged.
- Never share your recovery phrase with anyone and avoid digital storage to prevent potential hacking.
4. Complete the Security Checklist:
- Ledger Live will guide you through a security checklist to ensure your device is genuine and secure.
- Confirm the device's authenticity through Ledger Live.
5. Optional Security Enhancements:
- You can set an additional password to unlock the Ledger Live application.
- Enable bug reports and analytics sharing if you wish to help Ledger improve its products. This can be configured in the settings of Ledger Live.
Following these steps will ensure your Ledger hardware wallet is set up securely, providing a strong foundation for managing your DeFi assets. For detailed instructions and additional support, refer to the official Ledger setup guide.
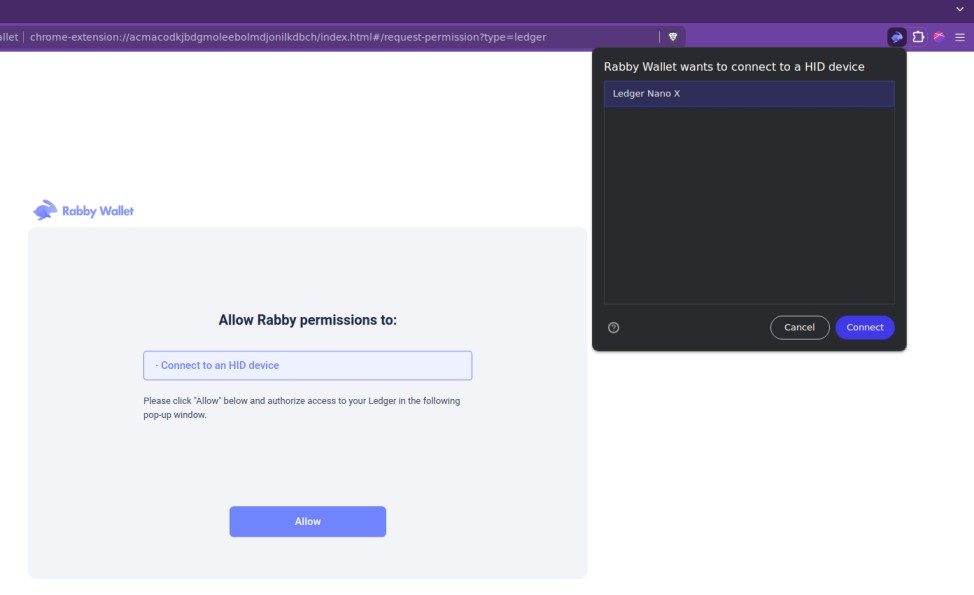
Connecting Ledger to Rabby Wallet
1. Access Hardware Wallet Integration
- Open Rabby Wallet: Click on the Rabby Wallet icon in your browser toolbar.
- Navigate to Settings: Go to wallet options and select “Connect Hardware Wallet.”
- Choose Ledger: Select Ledger from the list of supported hardware wallets.

2. Connect
- Connect Ledger: Plug in your Ledger device to your computer.
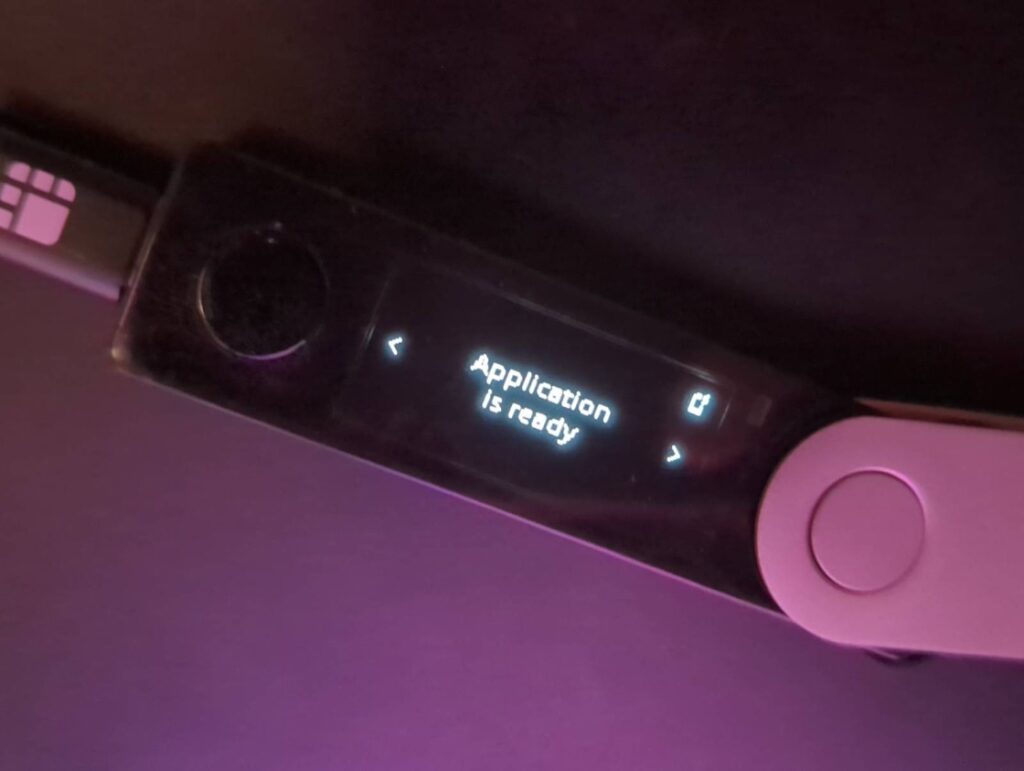
3. Unlock Ledger
- Unlock: Enter your PIN to unlock the device and open the Ethereum app on your Ledger.
4. Authorize Connection
- Authorize: Allow Rabby Wallet to connect to your Ledger device by following the on-screen prompts.
5. Manage Accounts
- View and Manage: Once connected, you can view and manage your assets using Rabby Wallet while ensuring your private keys remain secure on your Ledger device.
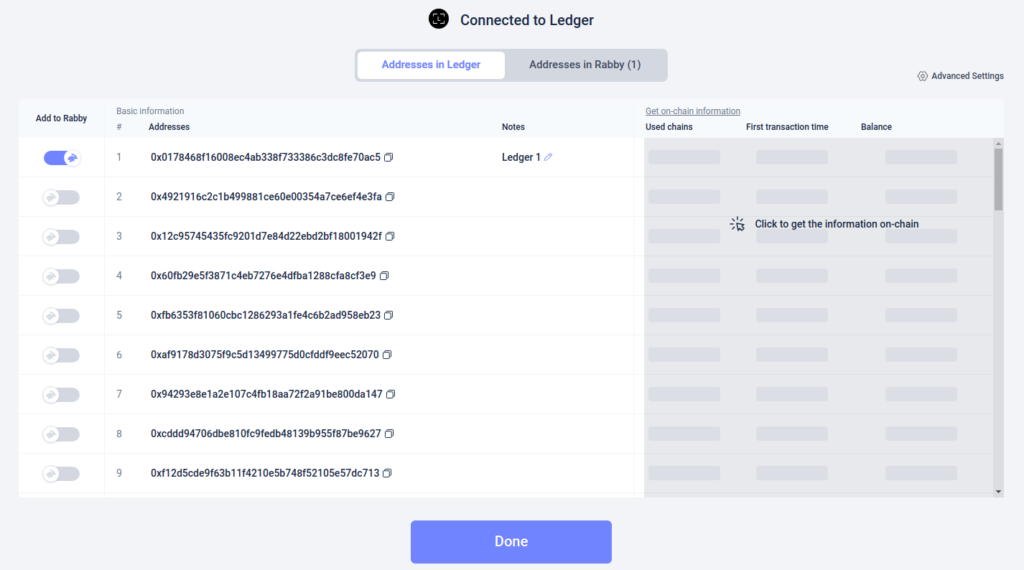
6. Imported Addresses and Editing
- Manage Addresses: You can view and manage the imported Ledger addresses within Rabby Wallet. Select the address you want to manage and click to view details or edit.
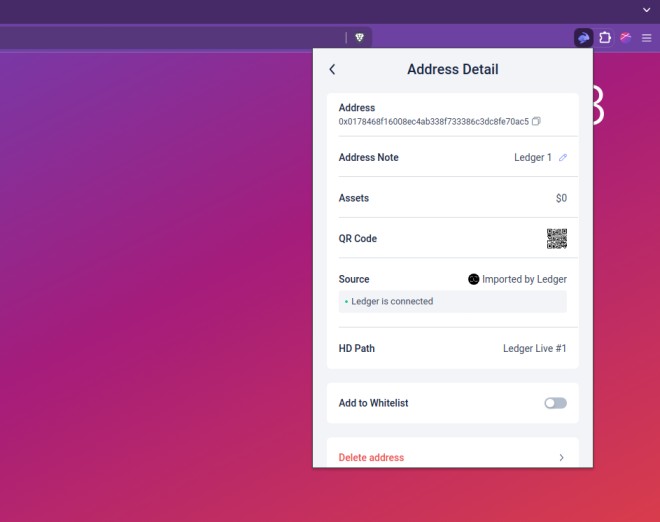
From now on, every transaction using this imported Ledger address will require physical authorization from the Ledger device, ensuring an additional layer of security for your DeFi activities.
Confirming Transactions Using Ledger in Rabby
When using a Ledger hardware wallet with Rabby Wallet, confirming transactions involves a secure two-step process. This process ensures that each transaction is authorized and verified physically on the Ledger device, adding an extra layer of security.
1. Initiating the Transaction:
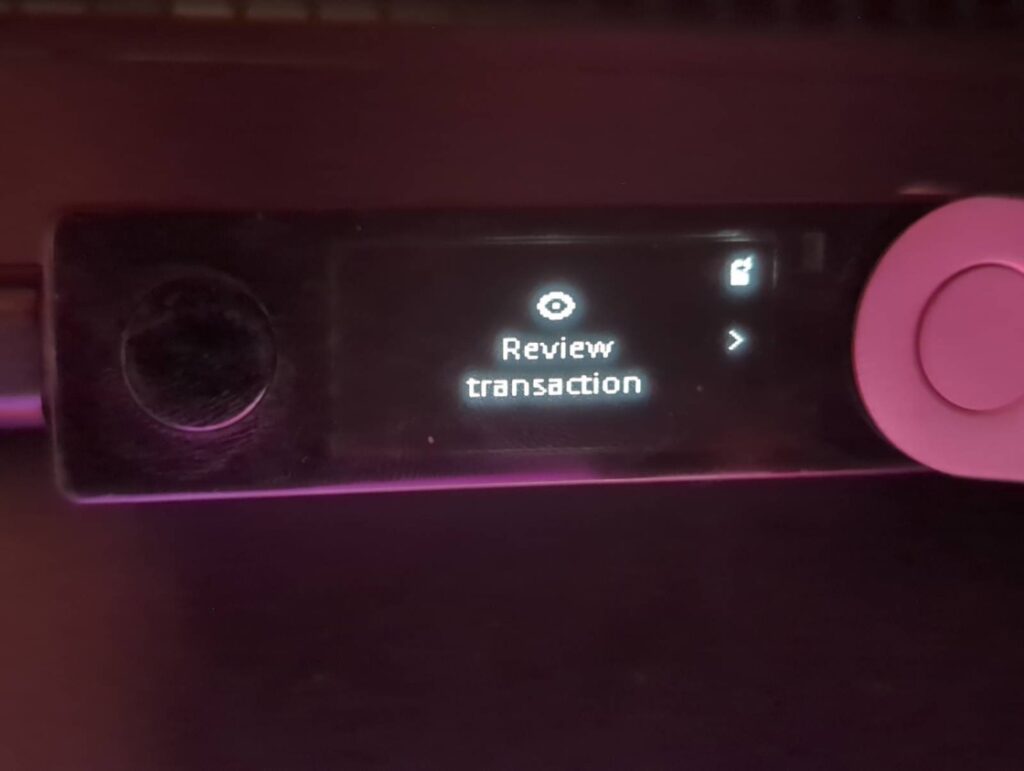
- Once you have confirmed the transaction details, you can begin the signing process on your Ledger device.

2. Reviewing and Confirming on Ledger:
- The Ledger device will display the transaction details for you to review.
- You need to physically confirm the transaction by navigating through the details and pressing the buttons on the Ledger device.
By following these steps, you can securely confirm your transactions, ensuring that each operation requires physical approval from the Ledger device. This method significantly reduces the risk of unauthorized transactions.
Conclusion
In this guide, we have explored the integration of GridPlus, Trezor, and Ledger hardware wallets with Rabby Wallet, each providing enhanced security for your DeFi activities. By using these hardware wallets, you ensure that your private keys remain offline and secure, protecting your digital assets from potential online threats.
Final Thoughts
Combining a hardware wallet with an extension wallet like Rabby Wallet offers a robust layer of security for managing your digital assets. This integration is crucial for anyone serious about securing their DeFi activities and ensuring the safety of their investments.
GridPlus, Trezor, and Ledger are all excellent choices for hardware wallets, each offering unique features and benefits. By following the step-by-step guides provided, you can seamlessly integrate these hardware wallets with Rabby Wallet, enhancing your security and peace of mind.
Integrating these hardware wallets with extension wallets like Rabby Wallet not only fortifies your digital asset management but also simplifies the process of transaction authorization. Whether you choose GridPlus, Trezor, or Ledger, leveraging their advanced security features will provide you with the confidence needed to navigate the DeFi space securely. Take the time to familiarize yourself with these devices and their integration processes to fully benefit from the enhanced protection they offer.
FAQs (Frequently Asked Questions)
What are Hardware Wallets?
Hardware wallets are physical devices designed to securely store the private keys necessary to access and manage cryptocurrencies. They are considered one of the most secure ways to store digital assets, as they are offline and less susceptible to hacking.
Which Hardware Wallets are Suitable for DeFi?
For DeFi, it's crucial to use hardware wallets that support the specific protocols and applications involved in decentralized finance. Look for hardware wallets that are compatible with popular DeFi platforms and provide a seamless integration experience.
Our Recommended Hardware Wallets for DeFi
Here is a list of our top recommendations for the best hardware wallets to use with DeFi: GridPlus Lattice1, Trezor Model T, and Ledger Nano X. These wallets have been tested and proven to work well with various DeFi applications.
Is it necessary to use an extension wallet like Rabby Wallet with a hardware wallet for DeFi?
While not mandatory, using an extension wallet like Rabby Wallet with a hardware wallet is highly recommended as it adds another layer of security and ease of use when interacting with DeFi protocols.