Introduction
Becoming a liquidity provider is one of the most foundational ways to participate in decentralized finance (DeFi). Instead of just swapping tokens, you're helping power the very markets others trade on – and earning passive rewards along the way.
When you provide liquidity, you deposit a pair of tokens into a smart contract called a liquidity pool. This pool enables other users to swap those tokens instantly, without needing a traditional order book. In return, you earn a share of the trading fees and potentially other incentives like yield farming rewards.
Sounds good, right? It is – but there’s more to it than just clicking “deposit.” As with everything in DeFi, this power comes with responsibility. If you don’t understand how liquidity provision works, you could face risks like impermanent loss or interact with unsafe contracts.
That’s why this guide exists.
In this complete step-by-step walkthrough, you’ll learn:
- How liquidity pools actually work
- What tools and platforms to use as a beginner
- How to safely deposit your assets and monitor your positions
- How to track rewards and optimize performance
- What risks to look out for – and how to manage them
Whether you're just starting out or want to understand LP mechanics before jumping in, this guide will equip you with everything you need to get started confidently – and safely.
Let’s get you earning the DeFi-native way – by putting your assets to work.
Understanding Liquidity Pools
How Liquidity Pools Work
Liquidity pools are the engine rooms of decentralized exchanges. They allow users to trade tokens instantly without needing to match buyers and sellers – instead, all trades are routed through smart contracts called automated market makers (AMMs).
Here’s how it works in simple terms:
You deposit two tokens (like ETH and USDT) into a liquidity pool. These tokens form a trading pair and are locked inside a smart contract. Other users can then swap between these tokens, and the pool automatically adjusts the price based on supply and demand.
This price adjustment follows a mathematical formula. The most common is the constant product formula used by Uniswap:
x * y = k
Where:
xis the amount of token Ayis the amount of token Bkis a fixed constant
As one token is bought, the other must be added to maintain the balance – this is what allows the pool to always provide a price and never run out of assets (though the price may become less favorable for large trades).
Types of Liquidity Pools
Not all pools behave the same. Depending on the platform and token pair, you’ll encounter different pool types:
Standard Pools
- These are the basic 50/50 token pools (e.g. ETH/USDC) found on most AMMs. The tokens are held in equal value, and pricing follows the classic x*y=k model.
Concentrated Liquidity Pools
- Introduced in Uniswap V3, these pools let LPs provide liquidity within specific price ranges instead of the whole spectrum. This allows for more efficient capital usage but requires more active management.
Stable Pools
- Designed for assets that are meant to stay at the same value (like USDC/DAI or wETH/stETH. These use a different pricing curve that allows for tighter spreads and less slippage.
Each pool type comes with its own trade-offs – standard pools are easy to use, concentrated pools can boost returns, and stable pools are great for low-volatility assets.
How Liquidity Providers Earn
As a liquidity provider (LP), you earn a share of the trading fees every time someone swaps through the pool. These fees are automatically collected and proportionally distributed to LPs based on how much of the pool they own.
On top of trading fees, many protocols also offer liquidity mining rewards – bonus tokens given to LPs to incentivize deeper liquidity. These rewards vary by platform and can significantly boost your yield.
In short: by adding tokens to a liquidity pool, you're helping the DeFi economy function – and getting paid in return.
Key Concepts Before You Start
Before jumping into your first liquidity position, it’s important to understand a few foundational concepts. These will help you manage expectations, avoid costly mistakes, and evaluate whether a specific pool fits your risk and reward profile.
Impermanent Loss (IL): What It Is and Why It Matters
Impermanent loss is one of the most misunderstood risks in DeFi. It happens when the prices of the tokens in your liquidity pair change relative to each other after you’ve deposited them.
Let’s break it down with an example:
- You deposit 1 ETH (worth $2,000) and 2,000 USDC into a 50/50 ETH-USDC pool.
- ETH’s price rises to $3,000 while USDC stays the same.
- Traders use your ETH to swap for USDC, rebalancing the pool.
- When you withdraw, you now hold less ETH and more USDC.
Even though the total dollar value of your position increased, you would have had more value just holding the assets outside the pool. That difference is impermanent loss.
It’s called impermanent because it only becomes real if you withdraw your assets while the price ratio is changed. If prices return to their original state, the loss disappears – but that rarely happens in practice.
💡 Tip: Impermanent loss is lower for stablecoin pairs and higher for volatile pairs with large price divergence.
How Fees and APR Work
Every time someone swaps through a liquidity pool, they pay a small fee – usually around 0.3% of the trade amount. These fees are distributed to all LPs based on how much of the pool they own.
That means your rewards grow over time as more volume passes through the pool.
You’ll often see liquidity positions advertised with an APR (Annual Percentage Rate). This represents your estimated yearly return from fees (and sometimes rewards). It’s calculated based on:
- Pool trading volume
- Your share of the pool
- The fee rate (e.g. 0.3%)
Keep in mind: APRs are variable and depend heavily on market activity. High APRs can drop quickly if volume dries up or new liquidity enters the pool.
APR = (Your Earned Fees / Your Liquidity) × (365 / Days in Pool) × 100%
Some platforms also offer APY (Annual Percentage Yield), which includes compounding effects if you reinvest your earnings.
What Are LP Tokens?
When you deposit tokens into a liquidity pool, you receive something called an LP token (liquidity provider token). This represents your share of the pool – like a receipt for your deposit.
You’ll need this token later to withdraw your funds. But LP tokens can also be:
- Staked in farming contracts to earn extra rewards
- Used as collateral in lending protocols
- Traded or transferred (in some cases)
Because LP tokens represent access to the underlying assets, losing them means losing your liquidity – so handle them with the same care as regular tokens.
Choosing the Right Platform for Your First LP Position
Not all liquidity platforms are created equal. Some are built for high-volume trades and volatile assets, while others specialize in stablecoin efficiency and minimal slippage. Choosing the right platform for your first liquidity position can make a big difference in how easy it is to manage – and how much yield you actually earn.
Let’s take a closer look at the two most beginner-friendly platforms: Uniswap and Curve.
Uniswap – The Standard for Token Liquidity
Uniswap is the most widely used decentralized exchange in DeFi. It introduced the automated market maker (AMM) model and is known for supporting a wide range of token pairs – from ETH and USDC to meme coins and experimental tokens.
Uniswap V3 introduced concentrated liquidity, allowing LPs to specify price ranges where they want to provide liquidity. This boosts fee efficiency but adds complexity.
Best For:
- Volatile token pairs (e.g. ETH/USDC, wBTC/ETH)
- Earning from high-volume pools
- Users who want control over pricing ranges (with Uniswap V3)
Fee Structure:
- Multiple fee tiers (e.g. 0.05%, 0.3%, 1.0%) depending on pool
- Fees are distributed to LPs based on share and range usage
Rewards:
- Primarily earned from trading fees
- Some pools offer bonus incentives via external protocols
💡 Tip: Beginners may want to start with wide-range liquidity or use interfaces that simplify Uniswap V3 (like Gamma or Arrakis).
Curve – Optimized for Stablecoins
Curve is purpose-built for assets that stay close in price – like stablecoins (USDC/DAI) or wrapped tokens (wBTC/renBTC). Its unique AMM curve reduces slippage and maximizes capital efficiency for similar-priced assets.
Curve’s UI may feel a bit outdated, but its mechanics are powerful and time-tested.
Best For:
- Stablecoin pairs (e.g. USDC/DAI, USDT/USDC)
- Low-risk, low-volatility liquidity positions
- Users seeking minimal impermanent loss
Fee Structure:
- Flat 0.04% trading fee (subject to pool parameters)
- 50% of fees go to LPs, 50% to veCRV holders
Rewards:
- Trading fees + CRV incentives + potential partner tokens
- Many Curve pools are boosted by DeFi protocols like Convex or Yearn
💡 Tip: Curve is ideal for LPs who want to earn yield on stablecoins with less volatility risk.
How to Choose the Right Pool
When deciding between platforms and pools, here are key factors to evaluate:
- Pool Volume: More volume = more fees earned. Check historical activity.
- TVL (Total Value Locked): Indicates how much capital is in the pool. Higher TVL often means greater stability.
- Volatility: Stablecoin pairs reduce impermanent loss risk, while volatile pairs may offer higher returns (and higher risk).
- Fees vs. Rewards: Compare trading fees and any additional incentives. Curve often layers rewards, while Uniswap focuses on fee earnings.
For your first position, start simple. Choose a popular, well-established pool on Uniswap or Curve – like USDC/DAI on Curve or ETH/USDC on Uniswap. These are beginner-friendly, low-friction pools with clear interfaces and strong support across DeFi tools.
Complete Step-by-Step Guide to Adding Liquidity
Preparing Your Assets
Before you jump into adding liquidity on Uniswap, you’ll need to get your wallet and tokens in order. While providing liquidity is a straightforward process, missing a few basic steps here can lead to frustration – or failed transactions.
Token Pair Requirements
Most liquidity pools on Uniswap require you to deposit two tokens that make up the pair. For example, to provide liquidity to an ETH/USDC pool, you’ll need equal values of ETH and USDC.
Uniswap V3 supports concentrated liquidity, but you still need to deposit both tokens unless the current price sits exactly at the edge of your chosen range – which is rare.
✅ Tip: Use a DEX like Uniswap to pre-swap assets so your amounts are balanced before you deposit.
Balanced vs. Single-Sided Options
In some DeFi protocols, you can deposit a single token and have the platform auto-swap and balance it. Uniswap doesn’t do this natively.
That means:
- You must supply both tokens manually.
- If you supply only one, your deposit will fail or be rejected by the contract.
- External tools or aggregators may support single-sided LP, but this guide focuses on native Uniswap behavior for safety and simplicity.
💡 Advanced platforms like Arrakis or Aura may enable more flexible LP options – but they’re outside the scope of this guide.
Setting Aside Gas Funds
Don’t forget to leave a portion of your wallet in ETH (or the native gas token of your network) to pay for transaction fees.
You’ll typically need gas for:
- Token approvals (if it’s your first time using a token)
- Adding liquidity
- Later withdrawing or managing your position
Estimated gas usage (on Layer 2 like Arbitrum):
- Token approval: ~$0.10 – $0.30
- Add liquidity: ~$0.30 – $0.80
- Remove liquidity: ~$0.30 – $0.60
⚠️ Never go all-in on your LP deposit – always reserve enough ETH for gas, or you may get stuck unable to withdraw.
Connecting to a DEX
To start providing liquidity, you’ll need to connect your wallet to the decentralized exchange interface. In this guide, we’re using Uniswap V3, the most widely used and beginner-friendly platform.
Step 1: Visit the Official Uniswap App
Go to app.uniswap.org
✅ Pro tip: Bookmark the URL – there are many fake clones that mimic the interface but drain wallets.
At the top-right corner, click “Connect Wallet.”

Step 2: Select Your Wallet Provider
You’ll see a popup asking which wallet to connect. Choose from:
Click your preferred option and follow the prompts.

Step 3: Confirm the Connection
Your wallet will show a confirmation screen asking if you want to allow Uniswap to see your public address. This is safe – Uniswap cannot move your funds unless you approve that later.

Once connected, your wallet address will appear in the top-right corner. You’re now ready to add liquidity.
Find a Pool and Configure Your Position
Step 1: Browse Available Pools
Once your wallet is successfully connected, it’s time to explore existing liquidity pools. While Uniswap does let you create your own, this is typically more expensive due to gas costs – and it's rarely needed for beginners.
Instead, it’s better to join an active pool with existing volume, trading activity, and clear reward structures.
To get started:
- Click Explore in the top navigation bar
- Then select Pools from the dropdown
This brings up the Pool Explorer, where you can browse a variety of liquidity pools and trading pairs available for selection.

Step 2: Review Pool Stats and Select a Pair
Once inside the Pools page, you’ll see a list of active liquidity pools. Each row gives you valuable data to help evaluate where to deploy your assets:
- TVL (Total Value Locked) – the total capital in the pool
- Pool APR – projected annual returns from trading fees
- Fee Tier – shows how much each trade in the pool is charged (e.g. 0.05%, 0.3%, 1%)
- Reward APR – extra incentives, if available
- Protocol – Uniswap V2, V3, or V4 pool format
- Network – based on your connected chain (e.g. Arbitrum, Ethereum, Base)
You can also switch between networks or filter by protocol version using the dropdown menus.
For this guide, we’ll proceed with the ETH/USDT pair on Uniswap V3 – it has strong volume and a manageable fee tier.

Click the ETH/USDT row to open the pool details and continue to the next step.
Step 3: Analyze Pool Details and Proceed
After clicking into the ETH/USDT pool, you’ll land on a dashboard showing detailed stats about this specific trading pair.
Here you can review:
- 24H trading volume – shows how actively the pair is traded
- Pool balance breakdown – how much ETH and USDT is currently in the pool
- Total APR – potential annual yield based on current fee volume
- Recent transactions – lets you see what kind of trades are flowing through
This is where you make an informed decision. High volume and balanced liquidity can often mean better, more consistent fee income for LPs.
When you're ready to continue, click the “Add Liquidity” button in the top right.

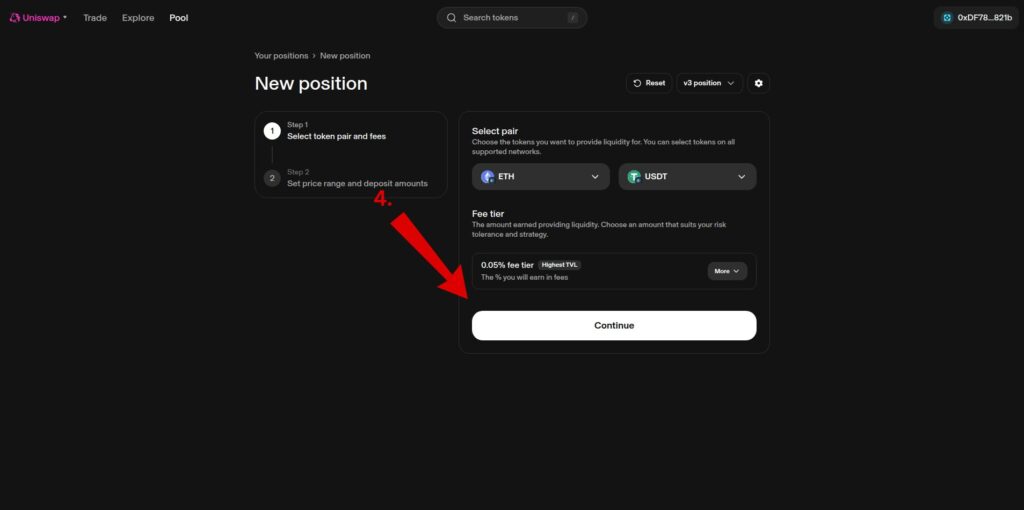
Step 4: Confirm Token Pair and Fee Tier
Next, you’ll land on the “New Position” setup screen. This is where you confirm (or change) the token pair and select your fee tier.
Uniswap lets you choose from multiple fee tiers:
- 0.05% – Ideal for stablecoin pairs or low-volatility assets
- 0.30% – Default for most tokens, balances volume and fee income
- 1.00% – For exotic or volatile pairs with less competition
- (V4+ may offer experimental tiers depending on deployment)
Fee tiers determine how much trading revenue LPs earn. More popular tiers typically have higher TVL, while niche tiers might yield higher % fees but less consistent volume.
You can also switch between Uniswap V2, V3, or V4 protocol modes here. We’ll stick with V3, which supports concentrated liquidity and is widely used across networks.
In our case, ETH/USDT at 0.05% is already selected – a safe choice with good volume and existing liquidity.
When ready, click Continue to proceed.
Step 5: Set Your Price Range (Full Range vs. Custom Range)

After selecting your token pair and fee tier, it’s time to define the price range where your liquidity will be active. This is a key feature of Uniswap V3 and one of the biggest changes compared to older AMMs.
By default, Uniswap will set your position to Full Range – meaning your liquidity is active across all prices.
You can also choose Custom Range, also called concentrated liquidity, to define a specific min/max range. This lets you deploy capital more efficiently and earn higher fees – but comes with more risk and requires active management.
Let’s break down the two options:
Full Range (Passive Liquidity)
- ✅ Covers all possible prices
- 🧘 Easy to manage – no need to rebalance
- ⚠️ Less capital efficient – lower earnings per dollar
- 💧 Lower risk of going “out of range”
- 💸 More exposure to impermanent loss

Custom Range (Concentrated Liquidity)
- ✅ Focuses your capital within a defined price range
- 📈 Higher capital efficiency = potentially more fees
- ⚠️ If price moves outside your range, you stop earning fees
- 🔁 Requires rebalancing or range updates in volatile markets
- 💰 Often used by advanced LPs to maximize APR

If you’re just starting out, Full Range is a safer way to begin while you learn. More advanced users can experiment with custom ranges to optimize returns.
Once you've chosen your range, continue to the next step to enter token amounts and review your deposit.
Step 6: Enter Deposit Amounts and Review
After you’ve set your price range, scroll down you’ll see the Deposit tokens screen.
This is where you choose how much of each asset to contribute to the pool.

Depending on the price range you selected in the previous step, the DEX will automatically calculate how much of each token is required. In this case, with a full range position, Uniswap asks for equal value of ETH and USDT.
You can either:
- Manually enter the amount of one token (the other auto-adjusts), or
- Click the “Max” button to use all available balance for that token
🧠 Tip: Always leave a little ETH (or native token) in your wallet for gas fees. Don’t deposit your full balance.
Once you’re happy with the numbers, click Review to move to the final confirmation screen.
Step 7: Final Review and Create Position
After clicking Review, you’ll see the final confirmation window.
Here’s what to double-check:
- Token pair – Make sure you’re adding to the correct pool (ETH/USDT)
- Price range – Confirm it’s the range you intended (especially if you chose a custom range)
- Deposit amounts – Ensure they match your strategy and wallet balance
- Network fee – Displayed at the bottom, this is the gas fee required to submit the transaction
If everything looks good, click Create.

This will trigger a wallet popup to approve the transaction – we’ll cover that next.
Step 8: Approve Token for Spending
Before the final transaction can go through, you need to approve Uniswap to access your token (in this case, USDT). This is a standard DeFi safety feature that ensures a protocol can only use your tokens with your explicit permission.
🔐 Important Security Tip:
Never give unlimited token approvals. In this popup, edit the approval amount to match the amount you're providing (e.g., 4.0696 USDT) instead of leaving it on “infinite” by default.
Once you've double-checked and adjusted the amount, click Sign to authorize the approval transaction in your wallet.

Your wallet may ask you to confirm with a password, hardware key, or biometric check depending on your setup.
Step 9: Finalize and Confirm Your Liquidity Position
With the token approval done, your wallet now prompts you to confirm the actual liquidity deposit.
This transaction creates your LP position on Uniswap. In Uniswap V3, each liquidity position is minted as an NFT, representing your unique price range and deposit configuration.
🧾 Rabby Tip:
If you're using Rabby, you’ll see a simulation preview, showing the exact amounts of ETH and USDT that will be deposited and confirming the LP NFT you'll receive.
✅ Double-check:
- Chain and contract (Uniswap V3 on Arbitrum in this case)
- Token amounts
- Estimated gas fee
Once everything looks good, hit Sign and approve the transaction in your wallet.

⏱️ After confirmation, it might take a few seconds to finalize – then you’ll officially be a Uniswap liquidity provider!
Viewing and Managing Your LP Position
Once your liquidity position has been successfully created, it's time to review and monitor it. Whether you're checking stats in the Uniswap interface or exploring portfolio dashboards like DeBank and Zapper, here’s how to interpret what you see.
Uniswap: Your LP Dashboard
After adding liquidity, head to the “Pool” section on Uniswap to view your position. This dashboard gives you a real-time snapshot of your active LPs.

You’ll see:
- Your active position(s) with pair details
- APR (Annual Percentage Rate) based on current trading activity
- Whether your position is “in range” (this means it’s earning fees)
Click the pair to explore more detailed analytics.

This detailed position screen includes:
- Current market price
- Breakdown of tokens in the position
- Real-time chart of price movements
- Button to add/remove liquidity or collect fees
LP Token: Represented as an NFT
In Uniswap V3, each position is represented by a unique NFT. This NFT encodes the specifics of your position, such as the price range, token pair, and liquidity deposited.

This NFT can be viewed directly in your wallet or tracked under your NFT holdings. It’s also transferable-though moving it to a different wallet will move the LP position as well.
DeBank: Multi-Chain Portfolio Tracking
If you use DeBank, your LP position will appear in the DeFi section automatically once connected. This is great for users who want a consolidated view of their wallets across chains and platforms.

DeBank shows:
- Position value
- Token breakdown
- Protocol-specific data like token IDs and LP status
It’s also a great place to track earnings across other protocols in parallel.
Zapper: Quick LP Overview
Zapper is another portfolio tool that breaks down your DeFi assets in a clean and user-friendly interface.

It categorizes LP positions under Uniswap V3 and provides:
- Current value of each asset
- Estimated claimable fees
- Token-level visibility into your LP NFT position
Claiming Rewards & Removing Liquidity
Once your liquidity position is active, there are two primary actions you may eventually want to take:
- Claim your earned swap fees (rewards) without closing the position.
- Remove liquidity, which automatically claims any uncollected rewards in one transaction.
Here’s how to do both.
Claiming Rewards (Collecting Fees)
If you simply want to claim the fees you've earned from providing liquidity without exiting the position:

To do this:
- Click “Collect Fees” on your LP dashboard.
- A popup will show your unclaimed earnings per token.
- You can optionally choose to receive fees as ETH using the toggle.
- Click “Collect” to trigger the transaction in your wallet.
🧠 Tip: If you’re planning to remove liquidity soon anyway, you can skip this step, as the “Remove” function automatically includes your fees.
Exiting Your LP Position (Removing Liquidity)
When you’re ready to exit the LP position entirely:

- Click “Remove Liquidity”.
- Choose the percentage you want to withdraw (e.g. 100% for a full exit).
- Optionally toggle “Withdraw as ETH” if available.
- Click “Remove”.

On the next screen, you’ll see:
- Your expected return (ETH + USDT).
- Uncollected fees included in this transaction.
- Estimated gas fee.
Click “Confirm” to continue.
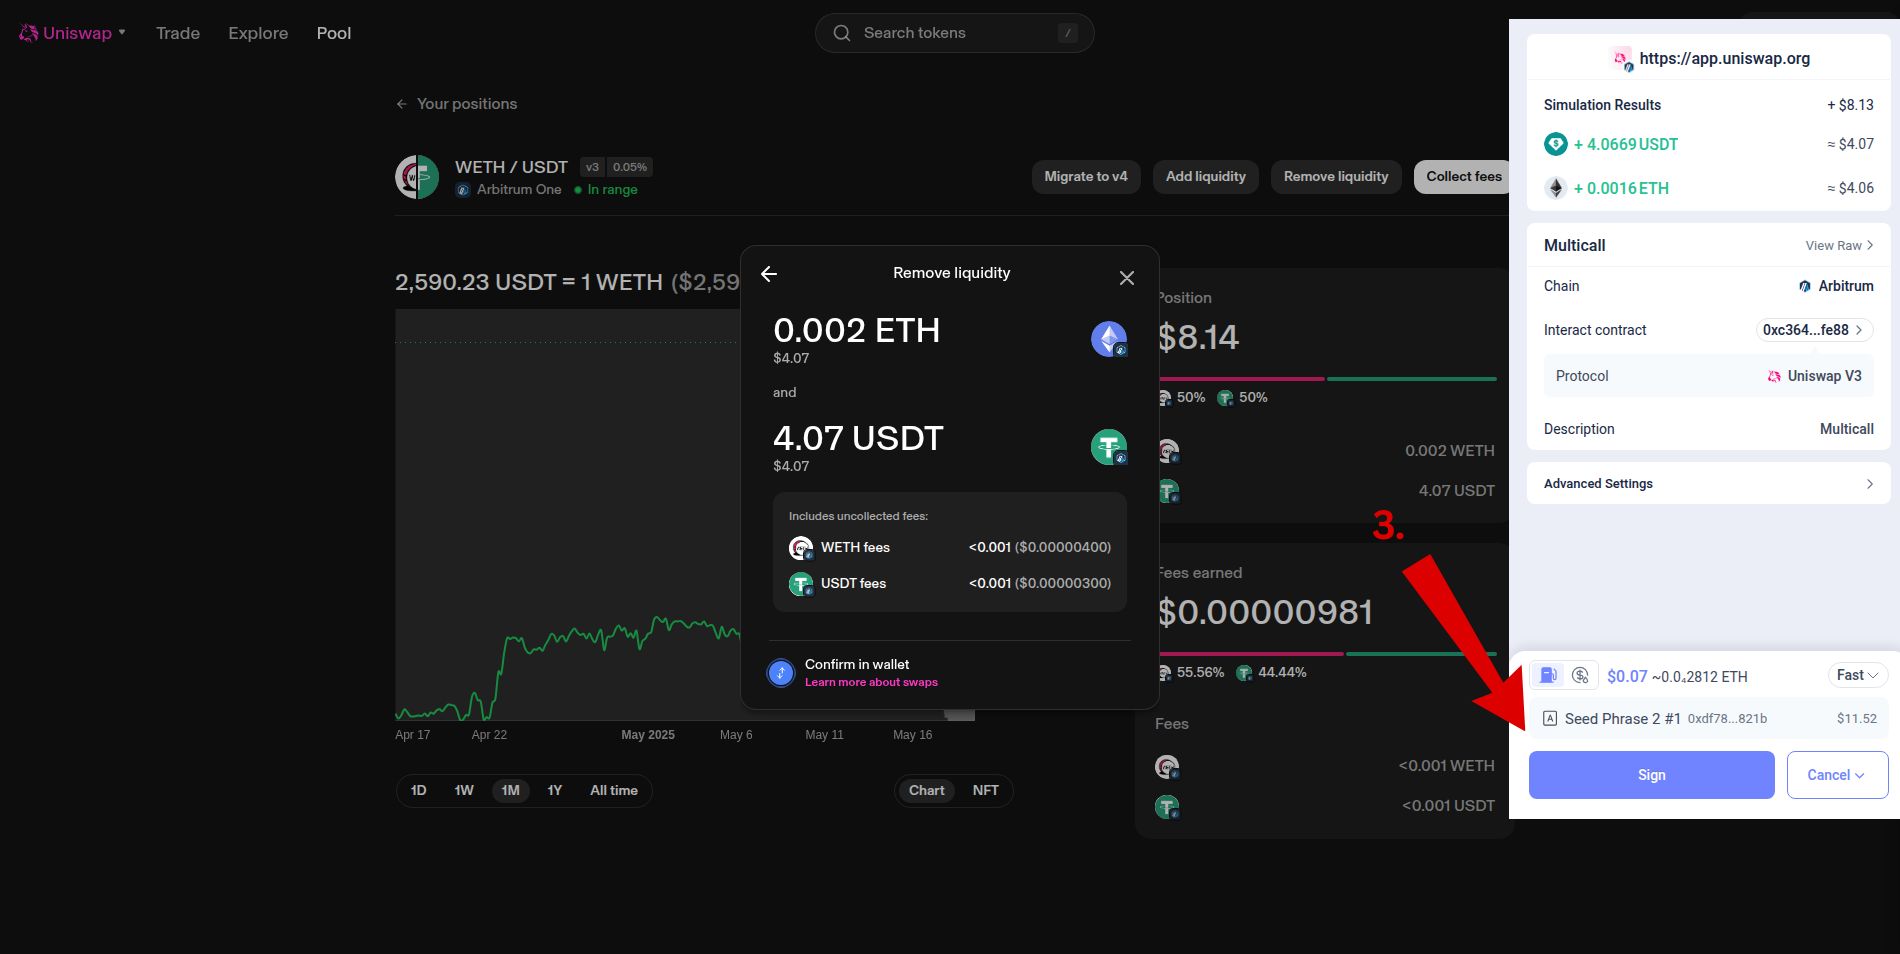
Your wallet will now prompt a final signature to confirm the transaction.
Once signed, your liquidity is removed, and the LP position is closed. All earned fees will be sent directly to your wallet alongside your assets.
Know the Risks Before You Scale
Now that you've successfully created and exited a liquidity position, it's tempting to go bigger – more capital, more platforms, more yield.
But before you dive deeper, it’s important to understand the key risks that come with being a liquidity provider. Here’s what every LP should keep in mind:
Impermanent Loss (IL) Isn’t Always Temporary
Even with a successful LP exit, your total return may still underperform simply holding your tokens – especially in volatile markets. IL is magnified when:
- Token prices diverge significantly
- You use tight price ranges
- You hold for short durations with low volume
Solution: Stick to correlated or stable pairs until you're comfortable with IL dynamics.
Smart Contract Risk Is Always There
Even audited protocols can be exploited – especially newer or less battle-tested ones. Uniswap is well-established, but newer DEXs or yield platforms may not be.
Solution: Research audits, check TVL, and only grant token approvals when necessary.
Market Volatility Can Liquidate or Deactivate Your Position
In concentrated liquidity strategies, rapid price movements can push your position “out of range,” halting fee generation.
Solution: Use wider ranges or monitor frequently – or consider passive vaults that auto-rebalance.
Overexposure to LPs = Lack of Diversification
It's easy to get caught up in LP strategies, but putting all your capital into liquidity farming exposes you to one sector of DeFi.
Solution: Balance your portfolio with lending, staking, and yield-agnostic positions.
This awareness helps you grow sustainably – not just chasing APRs, but building a strategy that can survive both bull and bear markets.
Now that you understand the risks, let’s look at where else you can apply your skills.
Beyond Uniswap: What Comes Next for Liquidity Providers
Now that you’ve gained hands-on experience providing liquidity on Uniswap, it’s important to understand that this is just one piece of the broader DeFi puzzle.
There are dozens of decentralized exchanges (DEXs) across multiple blockchains that offer similar opportunities – often with different incentives, fee structures, and risk profiles.
From stable-focused platforms like Curve, to dynamic-fee engines like Balancer, and new-gen DEXs like Trader Joe, the landscape is rich with options.
👉 Explore our full curated list of decentralized exchanges.
Each one offers unique pools and mechanics, but the core skills you’ve learned here – choosing a pair, adding liquidity, managing positions – will carry over almost 1:1.
Level Up: Yield Farming with LP Tokens
Providing liquidity is often just the first layer.
Many protocols allow (or encourage) you to stake your LP tokens to earn even more rewards through what's commonly known as yield farming.
One of the most iconic examples is the Curve + Convex relationship:
- Curve allows users to provide liquidity to stablecoin pools and earn fees + CRV rewards.
- Convex lets you stake those Curve LP tokens to boost your CRV yield even further.
- This creates a layered strategy: LP for base rewards, then stake for boosted yield – all while still retaining your position.
You’ll find similar setups with protocols like Beefy, Aura, Equilibria, Yearn and many others depending on the network you're using.
If your goal is to maximize the return on your liquidity while staying within a manageable risk zone, learning how to stake LP tokens is the next logical step.
With these expanded tools and strategies at your fingertips, you're ready to move beyond simple LP deposits and into a more intentional, optimized DeFi strategy.
Let’s wrap up everything you’ve learned.
Conclusion: From First Position to DeFi Pro
You’ve just taken a major step in your DeFi journey – not just by reading, but by understanding and potentially executing your first liquidity position on a decentralized exchange.
Along the way, you learned:
- How liquidity pools work and how LPs earn yield
- What impermanent loss is (and how to manage it)
- How to choose pools, add liquidity, and monitor your position
- How to claim rewards and exit safely
- Where to find more opportunities and level up with yield farming
Whether you stick to Uniswap or branch out to other DEXs like Curve, Balancer, or Trader Joe – the skills you’ve picked up here are universal. The more you explore, the more you’ll uncover new strategies, tools, and platforms designed to reward participation.
DeFi isn’t just a new financial system – it’s an evolving playground of possibility. And by becoming a liquidity provider, you’re not just watching from the sidelines anymore – you’re part of it.
🔗 Want to keep building?
Check out our other Unleash DeFi guides for tutorials, tools, and walkthroughs to level up your on-chain game.
FAQs (Frequently Asked Questions)
What is a liquidity provider in DeFi and how do liquidity pools work?
A liquidity provider (LP) in DeFi supplies tokens to liquidity pools, which are smart contract-based reserves that enable decentralized exchanges (DEXs) to facilitate token swaps without relying on traditional order books. Liquidity pools act as the backbone of decentralized trading by allowing users to trade assets directly against the pool's reserves, ensuring continuous market liquidity.
How do liquidity providers earn rewards and what role do fees and APR play?
Liquidity providers earn rewards primarily through a share of the trading fees generated each time someone swaps tokens via the pool they contribute to. These fees accumulate and are distributed proportionally based on one's share of the pool. The Annual Percentage Rate (APR) reflects the potential yearly return from these fees, helping LPs estimate their earnings over time.
What is impermanent loss and why should I be concerned about it as a liquidity provider?
Impermanent loss (IL) occurs when the value of tokens deposited into a liquidity pool changes compared to simply holding them outside the pool. This can lead to reduced returns or losses when withdrawing assets if prices have diverged significantly. Understanding IL is crucial because it represents a key risk factor that can impact overall profitability despite earning fees.
How do I choose the right platform and liquidity pool for my first LP position?
Selecting the right platform involves considering factors like platform reputation, security audits, user interface, supported token pairs, fee structures, and community trust. Popular platforms like Uniswap offer broad token options and user-friendly experiences, while specialized pools such as Curve cater to stablecoins with optimized fee models. Analyzing pool statistics and understanding token pair dynamics help ensure alignment with your investment goals.
What are LP tokens and how do I manage my liquidity positions post-deposit?
When you provide liquidity, you receive LP tokens representing your share in the pool; in Uniswap V3, these are unique NFTs symbolizing your specific position parameters. Managing your position involves monitoring these tokens via dashboards on platforms like Uniswap or portfolio trackers such as DeBank and Zapper. You can claim earned fees or remove liquidity by redeeming your LP tokens according to your strategy.
What risks should I be aware of before scaling up my liquidity provision activities?
Key risks include impermanent loss potentially leading to net losses despite fee earnings, smart contract vulnerabilities even in audited protocols, market volatility causing rapid price shifts that may deactivate concentrated positions, and overexposure resulting from lack of diversification across assets or pools. Being mindful of these risks helps in making informed decisions and managing your DeFi investments prudently.